NaseNaseweis
Active member
Die Gründe dafür das Substrat Erde komplett austauschen zu wollen (oder zu müssen) können unterschiedlich sein … was brauche ich nun dazu bzw. wie mache ich das denn überhaupt!? Die folgende Vorgehensweise eignet sich von der Anzucht bzw. Vorzucht bis hin zur Vegetationsphase, für die Blütephase ist es hingegen nicht zu empfehlen!
The reasons for wanting (or needing) to completely change the substrate soil can be different ... what do I need to do this or how do I do it at all? The following procedure is suitable for growing or pre-growing up to the vegetation period, but it is not recommended for the flowering period!
Was brauche ich dazu?
What do I need?
Wie mache ich das?
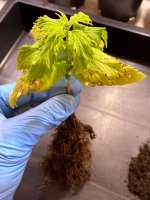
Zuerst wird der Hämpfling samt Erdballen aus dem Topf geholt. Als Zeitpunkt dafür hat sich der Tag an dem normalerweise wieder gegossen werden müsste gut bewährt, da hier das Erdreich ausreichend angetrocknet ist. Bei zu nassem Erdballen besteht die Gefahr, dass die Wurzeln zu sehr beschädigt werden da diese hierbei schneller abreissen könnten im Vergleich zur angetrockenten Erde.
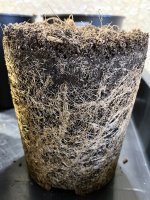
Der folgend abgebildete Erdballen stammt aus einem 1l AirPot, hier ist das mehr als einfach denn es wird nur ausgewickelt. Bei normalen Rund- oder Vierkanttöpfen hilft es diese vorher an den Seiten und ringsum etwas zu drücken und den bspw. Kochlöffelstiel vorsichtig von unten in die Drainage-Löcher des Topfes zu stecken bevor der Erdballen aus dem Topf gezogen oder geklopft wird. Bei RootPouches hilft leichtes rollen zwischen beiden Händen um im Anschluss daran den Stofftopf nach aussen umzukrempeln.
So oder so ähnlich steht dann also der Hämpfling inkl. Wurzelgeflecht vor uns:
How do I do this?
First of all, take the potted plant and its root ball out of the pot. The day on which watering would normally be necessary has proved to be a good time for this, as the soil has dried sufficiently. If the soil is too wet, there is a risk that the roots will be damaged too much, as they could break off more quickly than in the dry soil.
The soil ball shown below is from a 1l AirPot, here it is more than easy because it is only unwound. With normal round or square pots it helps to press them a little on the sides and all around beforehand and to insert the handle of a wooden spoon, for example, carefully from below into the drainage holes of the pot before pulling or tapping the ball of soil out of the pot. With RootPouches it helps to roll the pot lightly between both hands and then turn the pot outwards.
In this way or another, the potted plant including the root system is in front of us:
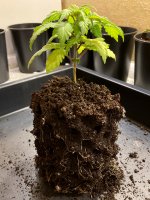
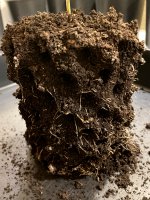
Beim zweiten Schritt braucht es ein wenig Fingerspitzengefühl. Hierbei wird der Erdballen in beide Hände genommen und vorsichtig solange zwischen den Fingern geknetet bzw. massiert bis sich die Erde nach und nach löst. Sobald die Erde weniger wird, und je mehr vom Wurzelgeflecht zum Vorschein kommt, bzw. auch zwischendurch, ist es hilfreich den Hämpfling am Wurzelansatz, also ganz unten am Stiel, zu packen und leicht auf den Boden (oder in die andere Hand) zu "stauchen" um die verbleibende Erde zu lösen. Sollten sich dabei einzelne wenige Wurzelfäden lösen ist das kein Grund zur Panik, es ist lediglich darauf zu achten, dass der Wurzelansatz nicht bricht, dann nämlich ist bzw. wäre der Hämpfling ein Fall für den Kompost.
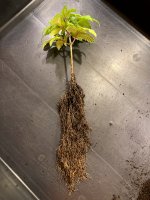
Wenn alles richtig gemacht wurde liegt die Pflanze dann so vor uns ...
The second step requires a little dexterity. Take the root ball in both hands and carefully knead or massage it between your fingers until the soil gradually loosens. As soon as the soil becomes less and more of the root system is revealed, or in between, it is helpful to grab the plant at the root base, i.e. at the very bottom of the stem, and gently "squeeze" it onto the ground (or into the other hand) to loosen the remaining soil. If a few root threads come loose, this is no reason to panic, just make sure that the root base does not break, because then the plant is or would be a case for the compost.
If everything has been done correctly, the plant will then lie before us like this ...
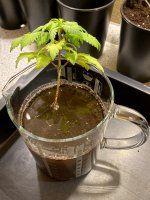
... und wird zu diesem Zeitpunkt kurz im mit Wasser bei Raumtemperatur gefüllten Messbecher (oder im Eimer) „zwischengeparkt“. Dieses Fussbad erleichtert das spätere Einpflanzen ungemein:
... and is then briefly "parked" in a measuring cup (or bucket) filled with water at room temperature. This footbath makes planting much easier:
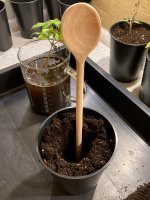
Als nächstes wird ein neuer Topf hergenommen, mit dem frischen bzw. neuen Substrat zu ca. 80-90% befüllt, leicht verdichtet und mit einem recht grosszügigen Loch, welches mit dem bspw. Kochlöffelstiel gebohrt wird, versehen:
Next, a new pot is taken, filled to approx. 80-90% with the fresh or new substrate, slightly compacted and provided with a fairly generous hole, which is drilled with the handle of a cooking spoon, for example:
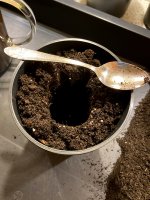
Dieses nun gebohrte Loch kann bei Bedarf und je nach Grösse bzw. Länge des Wurzelgeflechts mit dem Teelöffel oder Esslöffel entsprechend angepasst werden:
This hole, which has now been drilled, can be adjusted accordingly with the teaspoon or tablespoon if necessary and depending on the size or length of the root braid:
Im folgenden Schritt bedarf es wieder etwas von diesem "Fingerspitzengefühl", denn jetzt soll der Hämpfling mit den pitschnassen Wurzeln in das Loch gepfriemelt werden. Mehrfaches eintauchen ins Wasser löst nicht nur die restliche Erde von den Wurzeln, sondern bringt diese zudem in die "gewünschte" Form:
The next step requires a little more of this "dexterity", because now the potted plant with the soaking wet roots is to be put into the hole. Immersing the roots several times in water not only loosens the remaining soil from the roots, but also gives them the "desired" shape:
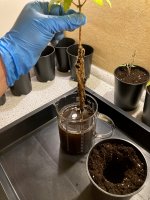
Beim "Wurzeln ins Loch stopfen" kann es unter Umständen und je nach Topfgrösse notwendig sein die Wurzeln spiralförmig in das hoffentlich zu gross gebohrte Loch zu versenken. Hierbei wird die Erde die sich am oberen Rand des Topfes befindet vorsichtig mit dem Teelöffel und parallel zum Wurzelballen von allen Seiten in das Loch gefüllt, Hohlräume sollen hier vermieden werden! Wenn der Hämpfling die richtige Position im Topf hat, meint die richtige Tiefe, dann wird die Erde ganz leicht angedrückt:
When "stuffing the roots into the hole", it may be necessary, depending on the size of the pot, to sink the roots in a spiral into the hole that has hopefully been drilled too large. The soil at the top of the pot is carefully filled into the hole from all sides with a teaspoon and parallel to the root ball; hollow spaces should be avoided here! When the root ball is in the right position in the pot, i.e. at the right depth, the soil is pressed down very lightly:
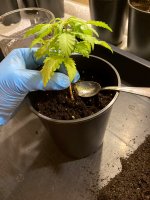
Hat das mit der Position bzw. Höhe nicht auf Anhieb geklappt, wird der Hämpfling einfach wieder vorsichtig herausgezogen, in den Messbecher (oder Eimer) mit Wasser gesteckt und ein neuer Versuch gestartet. Wenn es dann endlich passt, dann sollte das in etwas so aussehen:
If the position or height does not work right away, simply pull the potted plant out carefully, put it into the measuring cup (or bucket) of water and try again. When it finally fits, it should look something like this:
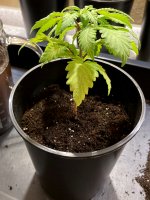
Zum Schluss wird der Topf nun noch bis zur gewünschten Höhe mit Erde befüllt, diese leicht angedrückt und mit Weidenwasser oder anderem Wurzelstimulator angegossen bis ein paar wenige ml Drain unten rausfliessen. Bei oder nach dieser Prozedur stagniert das Wachstum für ein paar wenige Tage und ist kein Grund zur Beunruhigung.
Finally, the pot is filled with soil up to the desired height, lightly pressed down and watered with willow water or other root stimulator until a few ml of drain flow out at the bottom. During or after this procedure, growth will stagnate for a few days and is no cause for concern.

The reasons for wanting (or needing) to completely change the substrate soil can be different ... what do I need to do this or how do I do it at all? The following procedure is suitable for growing or pre-growing up to the vegetation period, but it is not recommended for the flowering period!
Was brauche ich dazu?
- neues Substrat
- Latex- oder Vinylhandschuhe
- Esslöffel, Kochlöffel, Teelöffel
- Messbecher 0,5l oder 1l bzw. einen kleinen Eimer
- Pflanzschale in entsprechender Grösse (geht auch ohne, gibt dann nur mehr Sauerei)
What do I need?
- new substrate
- latex or vinyl gloves
- tablespoon, wooden spoon, teaspoon
- measuring jug 0.5l or 1l or a small bucket
- a planting tray of the appropriate size (you can do without, but it will make more of a mess)
Wie mache ich das?
Zuerst wird der Hämpfling samt Erdballen aus dem Topf geholt. Als Zeitpunkt dafür hat sich der Tag an dem normalerweise wieder gegossen werden müsste gut bewährt, da hier das Erdreich ausreichend angetrocknet ist. Bei zu nassem Erdballen besteht die Gefahr, dass die Wurzeln zu sehr beschädigt werden da diese hierbei schneller abreissen könnten im Vergleich zur angetrockenten Erde.
Der folgend abgebildete Erdballen stammt aus einem 1l AirPot, hier ist das mehr als einfach denn es wird nur ausgewickelt. Bei normalen Rund- oder Vierkanttöpfen hilft es diese vorher an den Seiten und ringsum etwas zu drücken und den bspw. Kochlöffelstiel vorsichtig von unten in die Drainage-Löcher des Topfes zu stecken bevor der Erdballen aus dem Topf gezogen oder geklopft wird. Bei RootPouches hilft leichtes rollen zwischen beiden Händen um im Anschluss daran den Stofftopf nach aussen umzukrempeln.
So oder so ähnlich steht dann also der Hämpfling inkl. Wurzelgeflecht vor uns:
How do I do this?
First of all, take the potted plant and its root ball out of the pot. The day on which watering would normally be necessary has proved to be a good time for this, as the soil has dried sufficiently. If the soil is too wet, there is a risk that the roots will be damaged too much, as they could break off more quickly than in the dry soil.
The soil ball shown below is from a 1l AirPot, here it is more than easy because it is only unwound. With normal round or square pots it helps to press them a little on the sides and all around beforehand and to insert the handle of a wooden spoon, for example, carefully from below into the drainage holes of the pot before pulling or tapping the ball of soil out of the pot. With RootPouches it helps to roll the pot lightly between both hands and then turn the pot outwards.
In this way or another, the potted plant including the root system is in front of us:


Beim zweiten Schritt braucht es ein wenig Fingerspitzengefühl. Hierbei wird der Erdballen in beide Hände genommen und vorsichtig solange zwischen den Fingern geknetet bzw. massiert bis sich die Erde nach und nach löst. Sobald die Erde weniger wird, und je mehr vom Wurzelgeflecht zum Vorschein kommt, bzw. auch zwischendurch, ist es hilfreich den Hämpfling am Wurzelansatz, also ganz unten am Stiel, zu packen und leicht auf den Boden (oder in die andere Hand) zu "stauchen" um die verbleibende Erde zu lösen. Sollten sich dabei einzelne wenige Wurzelfäden lösen ist das kein Grund zur Panik, es ist lediglich darauf zu achten, dass der Wurzelansatz nicht bricht, dann nämlich ist bzw. wäre der Hämpfling ein Fall für den Kompost.
Wenn alles richtig gemacht wurde liegt die Pflanze dann so vor uns ...
The second step requires a little dexterity. Take the root ball in both hands and carefully knead or massage it between your fingers until the soil gradually loosens. As soon as the soil becomes less and more of the root system is revealed, or in between, it is helpful to grab the plant at the root base, i.e. at the very bottom of the stem, and gently "squeeze" it onto the ground (or into the other hand) to loosen the remaining soil. If a few root threads come loose, this is no reason to panic, just make sure that the root base does not break, because then the plant is or would be a case for the compost.
If everything has been done correctly, the plant will then lie before us like this ...

... und wird zu diesem Zeitpunkt kurz im mit Wasser bei Raumtemperatur gefüllten Messbecher (oder im Eimer) „zwischengeparkt“. Dieses Fussbad erleichtert das spätere Einpflanzen ungemein:
... and is then briefly "parked" in a measuring cup (or bucket) filled with water at room temperature. This footbath makes planting much easier:

Als nächstes wird ein neuer Topf hergenommen, mit dem frischen bzw. neuen Substrat zu ca. 80-90% befüllt, leicht verdichtet und mit einem recht grosszügigen Loch, welches mit dem bspw. Kochlöffelstiel gebohrt wird, versehen:
Next, a new pot is taken, filled to approx. 80-90% with the fresh or new substrate, slightly compacted and provided with a fairly generous hole, which is drilled with the handle of a cooking spoon, for example:

Dieses nun gebohrte Loch kann bei Bedarf und je nach Grösse bzw. Länge des Wurzelgeflechts mit dem Teelöffel oder Esslöffel entsprechend angepasst werden:
This hole, which has now been drilled, can be adjusted accordingly with the teaspoon or tablespoon if necessary and depending on the size or length of the root braid:

Im folgenden Schritt bedarf es wieder etwas von diesem "Fingerspitzengefühl", denn jetzt soll der Hämpfling mit den pitschnassen Wurzeln in das Loch gepfriemelt werden. Mehrfaches eintauchen ins Wasser löst nicht nur die restliche Erde von den Wurzeln, sondern bringt diese zudem in die "gewünschte" Form:
The next step requires a little more of this "dexterity", because now the potted plant with the soaking wet roots is to be put into the hole. Immersing the roots several times in water not only loosens the remaining soil from the roots, but also gives them the "desired" shape:

Beim "Wurzeln ins Loch stopfen" kann es unter Umständen und je nach Topfgrösse notwendig sein die Wurzeln spiralförmig in das hoffentlich zu gross gebohrte Loch zu versenken. Hierbei wird die Erde die sich am oberen Rand des Topfes befindet vorsichtig mit dem Teelöffel und parallel zum Wurzelballen von allen Seiten in das Loch gefüllt, Hohlräume sollen hier vermieden werden! Wenn der Hämpfling die richtige Position im Topf hat, meint die richtige Tiefe, dann wird die Erde ganz leicht angedrückt:
When "stuffing the roots into the hole", it may be necessary, depending on the size of the pot, to sink the roots in a spiral into the hole that has hopefully been drilled too large. The soil at the top of the pot is carefully filled into the hole from all sides with a teaspoon and parallel to the root ball; hollow spaces should be avoided here! When the root ball is in the right position in the pot, i.e. at the right depth, the soil is pressed down very lightly:

Hat das mit der Position bzw. Höhe nicht auf Anhieb geklappt, wird der Hämpfling einfach wieder vorsichtig herausgezogen, in den Messbecher (oder Eimer) mit Wasser gesteckt und ein neuer Versuch gestartet. Wenn es dann endlich passt, dann sollte das in etwas so aussehen:
If the position or height does not work right away, simply pull the potted plant out carefully, put it into the measuring cup (or bucket) of water and try again. When it finally fits, it should look something like this:

Zum Schluss wird der Topf nun noch bis zur gewünschten Höhe mit Erde befüllt, diese leicht angedrückt und mit Weidenwasser oder anderem Wurzelstimulator angegossen bis ein paar wenige ml Drain unten rausfliessen. Bei oder nach dieser Prozedur stagniert das Wachstum für ein paar wenige Tage und ist kein Grund zur Beunruhigung.
Finally, the pot is filled with soil up to the desired height, lightly pressed down and watered with willow water or other root stimulator until a few ml of drain flow out at the bottom. During or after this procedure, growth will stagnate for a few days and is no cause for concern.


