Quazi
Member
Hello everyone. Quazi here with another guide to help everyone along in their travels. But first:

Now then, I've got some good tunes on, and my photos are all finally uploaded so here goes.
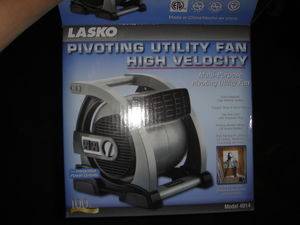
If you are reading this thread near the creation date, then I would hurry and check your local Lowes. I was looking for other supplies when I noticed it sitting on the shelf for $30.09 on clearance. I assume this is either because it was out of season or it was my lucky day (both?). I don't remember what the regular price was because I was too busy pretending I didn't just pee myself in excitement a tiny bit. However, I believe it was close to $50.00 (still not too bad).
Anyway, here's what I picked up:

I brought it home and plugged it in (expecting the worst). It was quiet, strong, good suction. Not only that, but it has 3 speed settings and 2 plugs which can deliver 10 amps and a heavy duty cord to boot. This is when I started to get excited. Another thing that got me jazzed about it was the design of the fan itself. Instead of being one huge cylinder that rotates, the cylinder of the fan is split in half meaning there is equal suction on both sides of the fans from the start. This is wonderful for those growing in a cabinet as you can ensure you'll get ventilation inside your electrical room and inside your cooling tube.
The fan had one drawback when it started. It was a bit bulky and I'm trying to fit it inside the dimensions of my electric room in my cabinet. I, like many others, only have around 10-12" to work with in there. Not only that, but I didn't want any grating, I wanted a straight shot into the cooling tube. If you check my signature you can see the cabinet that I am working on to better understand what I mean.
--UPDATE-- I called the company to get the CFM ratings for this fan. They're very similar to the Stanley blower:
Speed 1: 318 CFM
Speed 2: 395 CFM
Speed 3: 455 CFM
The point is, the fan was too damned big and I didn't want any grating for the side my cooling tube was going to be on. Well, it's DIY, you know what that means:
Let's grab some tools (or if you're just reading)!

 Lasko Blower Mod by Quazi

Before you start, please be smart:

To remove as much bulk as possible, this guide is going to run you through removing the grey plastic framing and ending up with one solid plastic piece per side. This is important because when you're cutting, it will be much easier to cut through a thinner, single, solid piece. Rather than a thin piece of plastic on a solid piece held by a couple of screws. Anyway, each of these solid pieces can then be topped, and you'll end up with a great blower. Be sure to make some room 'cause there's gonna be a lot of pieces and screws.
The first thing we need to do is get a hex key and remove the large silver screws in the handle and for the feet:

The other large hey keyed screws are hidden underneath small pieces of plastic near the base:


Once you remove the rest of the screws on that side (you can switch to Phillips Head now) you can take off the outside part of the fan:

Here comes one of the tougher parts that you might want help for if you don't want to break things (or yourself). I personally did not want any grating because I know I won't stick my hand in there and I want to have maximum ventilation for my cooling tube. The grating is sort of snapped in there and the plastic is fairly strong.
Here's the method that I used to remove it: have someone pull away from you holding the grey part while you, carefully, start to push the plastic pieces towards the middle of the grate. I heard a small popping sound for each one and it was off. That was the hardest part:

Now that you're half way through (What? It's that easy? Yes Susan it is that easy!), you can start to work on the other half of the blower:

You should be getting a nice pile of pieces and screws by now:


I forgot to take pictures of the process of removing the screws from the fan half of the contraption. It's fairly easy though. Remove the silver parts and keep the screws that are around the electrics and on the large plastic piece closets to the fan.
Now that you have all the ugly extra framing stuff off: here is the contraption in all it's glory. You can see the divided fan structure that I was talking about earlier:


Post continues below...

Now then, I've got some good tunes on, and my photos are all finally uploaded so here goes.
If you are reading this thread near the creation date, then I would hurry and check your local Lowes. I was looking for other supplies when I noticed it sitting on the shelf for $30.09 on clearance. I assume this is either because it was out of season or it was my lucky day (both?). I don't remember what the regular price was because I was too busy pretending I didn't just pee myself in excitement a tiny bit. However, I believe it was close to $50.00 (still not too bad).
Anyway, here's what I picked up:
I brought it home and plugged it in (expecting the worst). It was quiet, strong, good suction. Not only that, but it has 3 speed settings and 2 plugs which can deliver 10 amps and a heavy duty cord to boot. This is when I started to get excited. Another thing that got me jazzed about it was the design of the fan itself. Instead of being one huge cylinder that rotates, the cylinder of the fan is split in half meaning there is equal suction on both sides of the fans from the start. This is wonderful for those growing in a cabinet as you can ensure you'll get ventilation inside your electrical room and inside your cooling tube.
The fan had one drawback when it started. It was a bit bulky and I'm trying to fit it inside the dimensions of my electric room in my cabinet. I, like many others, only have around 10-12" to work with in there. Not only that, but I didn't want any grating, I wanted a straight shot into the cooling tube. If you check my signature you can see the cabinet that I am working on to better understand what I mean.
--UPDATE-- I called the company to get the CFM ratings for this fan. They're very similar to the Stanley blower:
Speed 1: 318 CFM
Speed 2: 395 CFM
Speed 3: 455 CFM
The point is, the fan was too damned big and I didn't want any grating for the side my cooling tube was going to be on. Well, it's DIY, you know what that means:
Let's grab some tools (or
 if you're just reading)!
 Lasko Blower Mod by Quazi

Before you start, please be smart:
To remove as much bulk as possible, this guide is going to run you through removing the grey plastic framing and ending up with one solid plastic piece per side. This is important because when you're cutting, it will be much easier to cut through a thinner, single, solid piece. Rather than a thin piece of plastic on a solid piece held by a couple of screws. Anyway, each of these solid pieces can then be topped, and you'll end up with a great blower. Be sure to make some room 'cause there's gonna be a lot of pieces and screws.
The first thing we need to do is get a hex key and remove the large silver screws in the handle and for the feet:
The other large hey keyed screws are hidden underneath small pieces of plastic near the base:
Once you remove the rest of the screws on that side (you can switch to Phillips Head now) you can take off the outside part of the fan:
Here comes one of the tougher parts that you might want help for if you don't want to break things (or yourself). I personally did not want any grating because I know I won't stick my hand in there and I want to have maximum ventilation for my cooling tube. The grating is sort of snapped in there and the plastic is fairly strong.
Here's the method that I used to remove it: have someone pull away from you holding the grey part while you, carefully, start to push the plastic pieces towards the middle of the grate. I heard a small popping sound for each one and it was off. That was the hardest part:
Now that you're half way through (What? It's that easy? Yes Susan it is that easy!), you can start to work on the other half of the blower:
You should be getting a nice pile of pieces and screws by now:
I forgot to take pictures of the process of removing the screws from the fan half of the contraption. It's fairly easy though. Remove the silver parts and keep the screws that are around the electrics and on the large plastic piece closets to the fan.
Now that you have all the ugly extra framing stuff off: here is the contraption in all it's glory. You can see the divided fan structure that I was talking about earlier:
Post continues below...
Last edited:


