What's new
  • ICMag with help from Landrace Warden and The Vault is running a NEW contest in November! You can check it here. Prizes are seeds & forum premium access. Come join in!

DIY Vertical Cooler System

G

Guest

The System

Well, i figured it was about time to get this thread going. Me and a few other's here at IC have been talking about this system and other types. This system is going to be basically a top feed or a Aero system. For me, i'm going to try top feeding first and then see how well the system works. If i'm not happy with the systems results as a top feeder. This hybrid system will be very easy to convert over to a Hybrid Aero system.

Thanks

First, before we get started. I'd like to thank my Chatroom buddies for the help and idea's. I'd like to name names, but i'm affraid i might forget someone. I'll just say, you guys know who you are and thanks for all your help and idea's. I'm sure you'll be here helping out as the system comes together. Thanks a ton.

First, you are going to need to buy one of these Igloo cooler's. You can find these are Wal-mart or online at another retailer. They run about 35-43 bucks. I think i got mine out the door for 37.00 dollars and it was the last one. This is going to be the base for your system and also the reservois tank.


T.doT.Toker

Leave this place better then when i arrived
Veteran
Hey buddy nice to see your getting back on to your feet. Praying for an early release and a good grow! Take it easy bro.
 
G

Guest

The Idea

The idea came after seeing one of those vertical grow cube systems. Well, after seeing the $4,500 dollar price tag and talking to other members. I figured, why not just build something like it. This first unit is jut going to be the Demo model. Once it's up and running and all the bugs are fixed and worked out. I'm going to build four more units. This will give me my cube with four sides. The Demo unit will be used as a swap unit. This will allow me to harvest every 2 weeks and run different strains and not worry about bouncing the fertz around. Each unit has it's own rez tank and PH, PPM won't be a problem. I'll simply had the Demo unit ready and rotate at unit out every two weeks. Once the full unit is harvested. That unit will be cleaned and refreshed with fresh fertz and cycled back inline with the next unit coming up for harvest. It, sounds like a great idea and will see after the whole system is up and running.

Placement

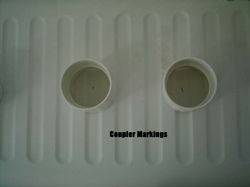
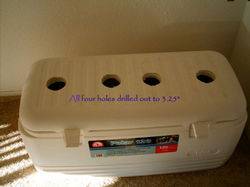
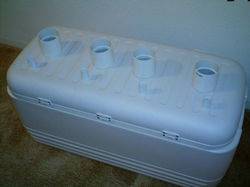
Here is the marks your going to need to drill out some 3.25" holes for the vertical tubes that your going to be installing soon. You will be drilling a total of four holes.

 
G

Guest

Alittle Info

If everyone will bare with me. I will post everything i used for tools and supplys. Just incase someone wants to build one. I'll try to list all measurements also, but if i miss something. Please, go right ahead and ask away. I'm more then happy to answer any question about this unit. There will be a shopping list, price list, and tool list at the end of the thread.
Thanks,
BG

Drilling Holes

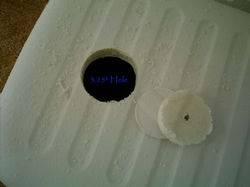
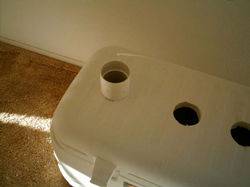
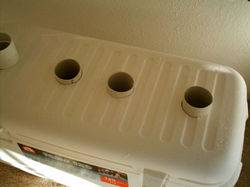
Ok, I've marked my hole and figured out the spacing for the four tubes i'm going to have. The spacing of the tubes are off, so it would be better for anyone doing a unit to figure out what they might want. If i would have went with a fifth tube. It would have been easier, but i suck with the four tube idea. The space was alittle hard, because i couldn't get a even spacing across the top of the lid. I wante each coupler to be over two of the ridges for better suport and less chance of sag. I think you'll understand better after seeing the pictures.

All holes are going to be drilled out with a 3.25" hole saw bit. The pipe i'm using is 3" sewer pipe and is thinner then the normal PVC pipe. You got to make sure you get this sewer pipe or you'll be returning wrong size fitting, because there are two different sizes of 3" PVC pipe. There is a ID and a OD and both are different sizes. I learnt the hard way for you guys and girls. lolol


If you notice here on picture number two. You can see how i made the cut of the hole over two ridged on the lid. To me, i think this will help support more weight then being in a valley of the lid


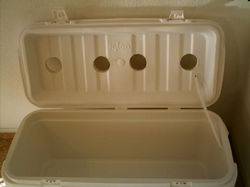
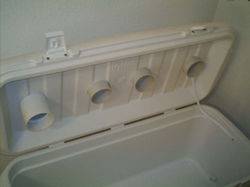
Here's a inside shoot of the lid after all the hole's are cut out.
 
G

Guest

Installing Coupler's

Ok, here I'm going to install the 3" coupler that are going to be used for the tubes that will be vertical. The vertical tubes will be inserted into these top coupler's. One thing about this system. The tubes will not be glued into the coupler's. I want to be able to remove the tubes, whenever i need to or want to. You'll see that alittle later on. I'm using two 3" coupler's for each tube. A top and inner to keep the tubes inplace. There will be a 4" long section of 3" PVC pipe and thing will be glued to the top and lower coupler. You will see this in the pictures.

Here is a picture of the 4" PVC space that will be glued into the coupler's.


Here you can see the 4" PVC pipe coming through from the inside of the cooler with a coupler already on it.


Here is a inside shot of the spacer's and coupler.


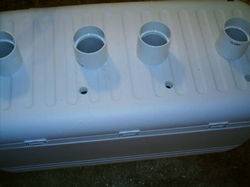
Here is the coupler job all done. All coupler are in place and ready for the next step.


One thing i need to point out. Everything will be dry fitted first. I want to make sure everything fit right, before doing any glueing. I thought i would let everyone know this. Glueing can cause problems if you run into a problem.

I'll post more tomorrow and upload more pictures. Thanks everyone for the post and kind words. Stay tune for more soon.
Take care,
BG
 
G

Guest

Head Plumbing

Ok, here is going to be the plumbing for the feeding heads that will feed all grow sites. I'm using regular 1/2" PVC and 1/2" fittings. The four holes that you see in the pictures is drilled out with a 7/8" hole saw. Here are the first holes and fittings.


Here's all four holes all drived out and ready for plumbing.


Here you will see the fitting all installed. I used four female adapters. These have 1/2" threads on one side and then a normal side for glueing. You will also need four pieces of 2.25" section of pipe for spaces.


Here is a inside shot of all the first of the fittings. You got two elbo's and two T's all 1/2". I will get to the rest of the plumbing for the pump tomorrow.


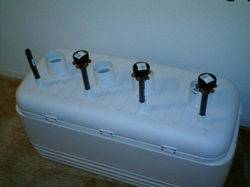
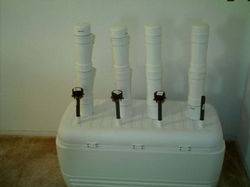
Here are the feeder heads installed. I used four 6" double threads exstender's to make sure i have enough space for the feeder hoses. Each head is a six site feeder. Again, all threading is 1/2" These heads simply screw on the pipes. OH, before anyone ask. Yes, there is one head missing. FUCKIN, Home Depot was out of them and i went to two other stores and nothing. I got to wait a week for them to restock. ASSHOLES. The reason i'm going with these heads over others. You can control the flow by a knob. I'll take beter and close-up's tomorrow and show you.


Here is a back shot of the feeder heads.


Well, it's late and i'm going to bed.
Night all,
BG
 
G

Guest

so glad to see this thread started...I got the canna butter anyone got some popcorn? :lurk:
 
G

Guest

Plumbing

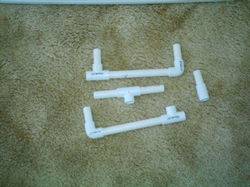
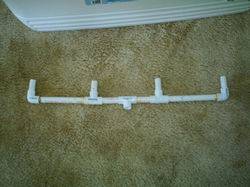
Afternoon everyone, glad to see so many friends watching. Here's the update for today and more to come. Just having alittle problems at home and running alittle behide today. Here's the plumbering you will need to make to feed the feeder heads that supply all the grow sites. I used normal 1/2" PVC and nothing special. You will need to make your own measuremen for the proper spacing. Here's what i got so far and i'll come back and post my measurements later on and some of the first pictures of the vertical tubes also.

Plumbing Hardware


Plumbing Ready

You want to glue the tubing together, because there is no other way to place it up and vertical through the little holes up to the feeder heads.


Installed & Pump Adapter

Here you'll will see all the piping is complete and installed. You will also notice the pump adapter. It's a 1/2" threaded barbed adapter. Almost every normal size pump uses a 1/2" hose, so no problems here


I'll update more later on and have some shots of the vertical tubes. Atleast some of them.
Thanks everyone for all the kind words and support.
Take care,
BG
 
G

Guest

Vertical Tubes

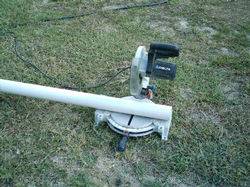
Ok, now your going to need some 3" sewer drain pipe. This stuff is thin walled and very easy to cut. I used a chop saw like in the picture. To make sure the cuts are nice and straight.


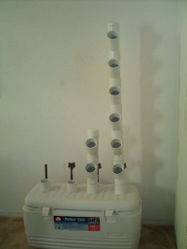
What your going to need to do. Is cut a bunch of 3" long sections as scaper's. These spacer's are going to be in the middle of the "wye". The Wye is the fitting you see in the pictures that looks like a big Y. Sorry, i forgot to take pictures of these close up. I'll make sure to do this tomorrow sometime. Once you got these spacer's cut. It's super easy to put together. Oh, and by the way. You don't need a chop saw. You can cut this PVC sewer pipe by hand. It's not thick at all. I just wanted to make sure i got the straightest cut i could. From this next picture. You will see a normal 6 grow site tube and another tube with 2 grow sites. I would have finish the other vertical tubes, but local suppiers where out of the wye's i needed. So, they are going to have any till this wed.


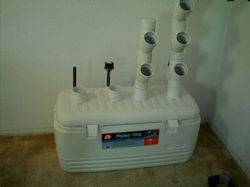
The next picture you will see that you can setup this unit any way you like. Since the spacer's and wye fittings aren't glued. You can change the grow site numbers are you see fit and also twist them either left or right for plants that are growing funny or hitting other plants.


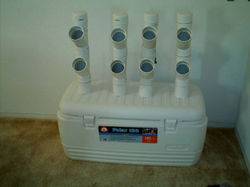
Here is a picture of the backside of the unit. Nothing special, just a idea of what it looks like.


Last, you need to check all PVC fittings before leaving store. I bought a cracked cap and didn't even know it, till i put it on. Cap's are not glued either. This will allow to clean the sytem out from time to time.


Well that is it for awhile and if anyone had any questions. Go ahead and firer away. I'll try to work on the dripper's and tubing to feeder heads tomorrow. Thanks again for all the support and kind words. I'd like to thank all those helping out in chat and pm. Thanks alot and take care.
BG
 
Last edited:

Sleepy

Active member
Veteran
nice rig, Bg!

what kind of pump are you gonna use?

how will you regulate reservoir temps?

:lurk: :lurk: :lurk:

thanks.
 
V

vhGhost

i'm really digin' this idea. since i've been wanting to make a vertical system myself, but i couldn't generate any good ideas. i especially like that you wouldn't have to veg for very long! .. good luck , and keep it up
!
 
G

Guest

Hey Sleepy, thanks for the kind words. It's been pretty fun so far. I'm thinking this unit will work well. As for the pump i'm going to use. I've found those new EcoPlus Submersible Water Pump - 396gph to work pretty well and you can find them at BGHydro. I'm thinking this should be enough since i'm not running but some simple 1/4" drip lines. One the small amount of 1/2" PVC pipe below the lid fill's up. It shouldn't take much from the pump to pump to all shits. Again, this is a Demo and i could be wrong, but will see soon enough. I've already got the pump, just waiting on the rest of the Wye fitting's to get in. As for the Rez Tank Temp. This is a cooler and i think it should hold a good temperature. There is alot of foam between the plastic. I noticed this once i driller out one of the 3" holes in the lid. If there is a problem. I'm sure i can figure it out. Thanks for your questions. I hope all is well with you and the family.
Take care,
BG

vhGhost
Thanks, for the respect and kind words. This system should work well. I've got a few things to work out, but once i do the work and any changes. It should be 100% for anyone to try. One problem i think i might have ran into. I think the lid might have to have a board set across the top. I'm alittle worried about the lid flexing under the weight once the system is loaded and plants start adding weight. I've already got a fix, if this is going to be a proble. It will be a easy fit also. Nothing hard to do and should work well, but i'm going to wait before i change anything else. Thanks again everyone for the kind words and support.
Take care all,
BG
 

englishrick

Plumber/Builder
Mentor
ICMag Donor
Veteran
What a fucking system!! I can see how it's all come together. Awesome!! Can't wait for you to finish the thread.
rick
 

Tomatoesonly

Active member
I don't know if you've used those feeder heads before. So take this with a grain of salt. I have tried 2 times to use those things, and both times I eventually had little drops of water bleeding out of them. It seems to me the company doesn't care too much about having water tight fittings since that stuff is supposed to be outside. You better test one now for a few hours to see if it is gonna work before you go and buy the rest.
 
Last edited:

Siddartha

Member
Holy crap, this is amazing!!!!

::plops his ass down criss-cross apple sauce(ROFL!)::

What modifications would one have to make to fit this in a cab?
 
Top