What's new
  • ICMag with help from Landrace Warden and The Vault is running a NEW contest in November! You can check it here. Prizes are seeds & forum premium access. Come join in!

Snype's Guide To RDWC - Part 1 - Featuring Chemdog Double Diesel & 2,000 Watts!

Snype

Active member
Veteran
Snype's Guide To My Personal FFOF (MOM) Peeps! (This link is your instruction manual for your MOMs):
https://www.icmag.com/ic/showthread.php?t=268343
That little message is for people who know who they are. All others can disregard it.

This grow already happened last year. Details will be short and to the point. All my data is saved in my files.
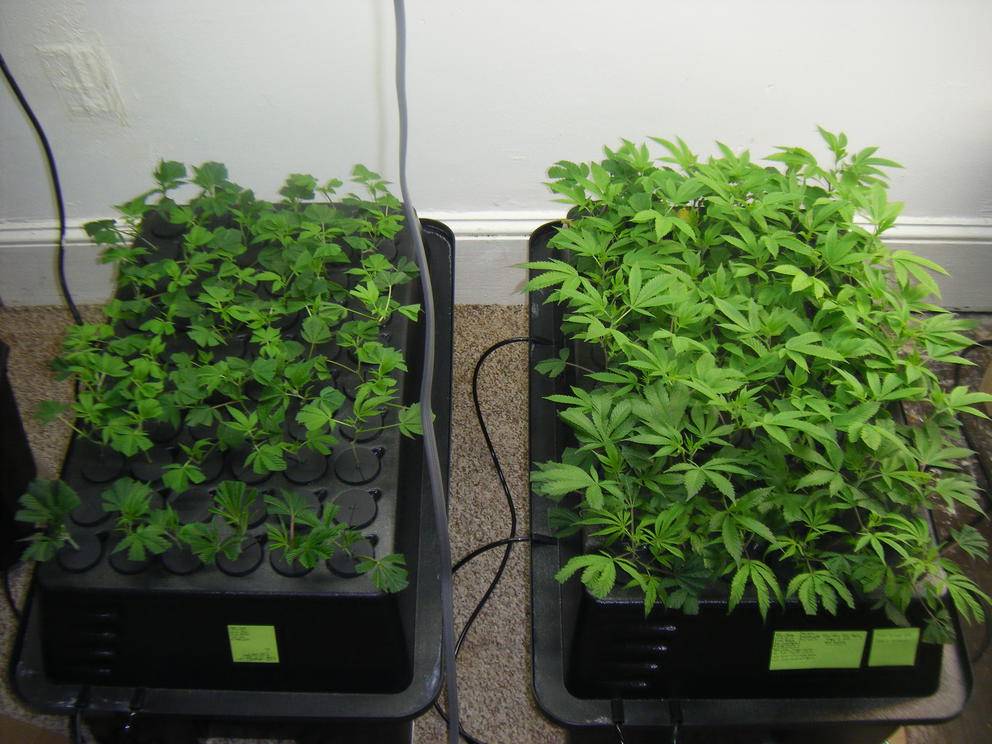
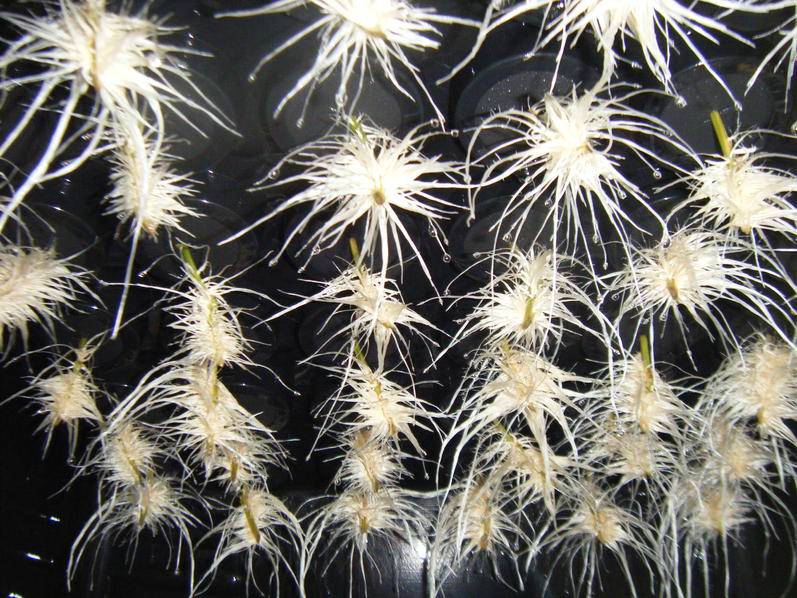
The cuttings were taken and put into an EZ Cloner. After no more than 10 days, I have full blown healthy roots. Most growers seem to think that water temperatures must stay under 73 degrees F. This is simply not true. I can run my temperatures in the 90's and still get healthy full blown roots. The trick is to use 1 PPM of Chlorine and don't use the air pump that came with your cloner. I use a much bigger air pump than my cloner came with. There is no way that you can use too much air. In fact, the more air that you can use the better.


After the plants get their roots in the cloner, they are transplanted into an Ebb & Flow table into what I call VEG-A. In this specific 2' x 4' Botanicare tray with a special order Botanicare lid with (15) 5" holes, I place 15 rooted cuttings into 5" pots of hydroton. It is best to take more clones than you will need and choose the healthiest ones. The plants don't ever sit on the tray. They hang directly in the air. In my experience when your plants hang directly in the air and the pots don't sit on the trays, you are able to grow a better root structure.


After 9 days, these plants range between heights of 9"-12". The point of VEG-A is not to grow the plants. You want to focus on root development. The light starts higher above the plants in the first 3 days of VEG-A. The reason is because you don't want to have to over water the plants. If I keep the light lower in the first days, then I will have to water more frequently but it will also slow down root development at the same time. Through data and testing I have seen that after a few days I can lower the light and then water more frequently as roots grow from under the tray lid. Your environment will not be the same as mine and environment will effect our plants differently. There is no formula that anyone can give you. You have to do your own testing and keep good accurate data and you will learn what your plants want. For me, the first 3 days, the tray gets flooded every 6 hours. On the 4th day, the tray gets flooded every 4 hours. On the 5th day the tray gets flooded every 3 hours and on the 6th day the plants get flooded every 2 hours. By the 7th day I flood the tray every hour and root growth has exploded by this time.

I flood my tray much differently than other growers who grow in Ebb & Flow. I completely remove the riser from the drain fitting and I also remove the screen on the drain fitting. This means that water flows down into the rez at a much faster rate with my technique and you get more dissolved oxygen into your solution. This also means that you will have to use a bigger water pump to accomplish this goal. If you use the riser on that drain fitting, when your pump turns off, it takes time for your solution to fall back down into the rez. That means that you are losing dissolved oxygen in your solution when your pump turns off and the more dissolved oxygen that you have, the better roots you will grow. In my opinion, you don't want your roots sitting in solution when your pump turns off while it takes a longer time for the solution to drain back into the rez. When my pump turns off, all the solution falls back into the rez within 60 seconds. I had a whole thread on this topic a couple of years back and it didn't seem to be taken seriously. I did all my testing with my Lab Grade Mettler Toledo Dissolved Oxygen meter that cost me over $2,000.
 
Last edited:

b00m

~No Guts~ ~No Glory~
Mentor
Veteran
Very nice way to make a comeback :good:
Welcome back :gday:
Chemdog DD is always a fav of mine to watch grow, so I'm watching yours even though it's in the past tense :D
:lurk:
 

Snype

Active member
Veteran
Snype's Guide To Cloning In Rockwool Or Aeroponics With 100% Success Rates!

This guide is to help out fellow growers who don't have perfect success in Rockwool or Aeroponics. Because of the data that I keep, I know how to have 100% success rates with my cuttings. I haven't lost 1 cutting for at least the last 10 years because of what I have learned.

It is extremely important to first talk about Sterile Conditions and Tools before cloning. Every surface must be cleaned with some sort of Bleach or Physan 20 and every tool that you use must be also cleaned with Isopropyl Alcohol or something of the like. Sanitary Conditions are very important to have 100% Success Rates.

It is also very important to take your cuttings from perfect healthy MOMS. Perfect healthy rooted cuttings come from perfect healthy MOMS. If you MOMS are unhealthy, it would be best to bring them back to full health before taking your precious cuttings.

Lets start out talking about cloning in Rockwool because I believe that more people use this method. When I clone in Rockwool, I use Grodan 1.5" Mini-Blocks. My first step is to label each Mini-Block with the corresponding cutting that is going to be put into the Mini-Block.

First I start with a clear light cover from a 60 watt CFL from home depot and wash it off with a bleach and water solution and put it aside. After that, I take a sterile container and I soak the 1.5 inch Grodan Mini-Blocks for 1 hour in a solution of:

4 mL General Hydroponics Flora Series Micro
6 mL General Hydroponics Flora Series Bloom
10 mL Technaflora Thrive Alive B-1 (RED)
ALL THESE RATES ARE PER GALLON OF WATER AND THE SOLUTION IS PH'D TO 5.8


After the Mini-Blocks soak in the solution, I slightly drain just a little bit of the solution by very slightly squeezing the Mini-Block which drains 5% of solution.


Lets take this time to talk about how I come up with exact percentages of solution drained. The average of my completely soaked Mini-Block weighs 67.3 grams. When I slightly drain the cube, it weighs 64.3 grams. Using a scale to fine tune your technique, adds consistency to taking your cuttings throughout your life. When you get used to using a scale for a while, you may start to become more familiar with how weights feel and then you won't need to use a scale anymore. An accurate calibrated scale will never lie to you.

After 5% of solution is drained from the Mini-Block, I take my cuttings from a Perfectly Heathy MOM and cut off the lower leaves while keeping the top leaves in tact. Then I take a 45 degree cut about 1/4 to 1/2 inch below the point where I cut off a leaf. This is what it looks like when I've made my cuts. Notice the 2 points on the stem from where I cut off the 2 leaves. These 2 point will be placed in the cube and that will be 2 more points where solution can have contact with the inside of the stem as well as the main diagonal cut that I made on the stem.


If the cutting has any big leaves on it, I trim the leaves so the plants can worry more about growing roots instead of saving big leaves.

Please note, I need to get some new pictures to replace these ones that came from flowering plants.

Now I just slide it down into the cube and go pretty close to the bottom of the cube without being able to see it touch the bottom though. I make sure that the points where I cut off the leaves completely make there way into the cube.

I take the rest of my cuttings and put them onto my light cover and make sure that all the cubes are touching. I can fit up to 18 cuttings on this clear light cover.
Insert Picture

Finally, I place the clear tray into a Propagation Tray & Dome that contains holes on the dome that can be open or closed. I make sure that I close the vents for the first 24-36 hours.

After 24-36 hours, I lift up the entire dome for 3-5 minutes and wipe off any condensation that collected on the Propagation Dome and let the cuttings get some fresh air. When I put the Dome back on, I keep all the vents open from this point on.

Every 24 hours, I lift up the entire dome for 3-5 minutes and wipe off any condensation that collected on the Propagation Dome and let the cuttings get some fresh air.

After about 5 days, I check the cubes to make sure there's enough solution in the cubes and also check to make sure they are not too heavy. On day 7-9, I am looking for the Mini-Block to weigh close to 48 grams. If your Mini-Block stays too wet, it takes much longer for your cuttings to root. If the cubes start to dry out, I add a little bit more solution but I squeeze out the excess very gently so they are not water logged. The sweet spot to getting fast roots is for the Mini Blocks to get to around 48 grams by day 7-9. I can usually get roots in 7-10 days and after about 7 or 9 days, if your Mini Blocks weigh over 55 grams and don't have a root that you can see from looking at the bottom of your clear tray, you need to keep the Dome off for longer periods of time. I don't like to keep the Dome off for more than 1 hour at a time so if you need more than an hour, do that every 6 hours or so. That's the beauty of these clear trays, you don't need to disturb the roots to see if you have roots, you just look underneath. Try these cloning techniques and watch your success rate go to 100%! Enjoy!


Aeroponics details coming later...
 
Last edited:

Snype

Active member
Veteran

I transferred 12 of the healthiest plants into the 12 bucket RDWC system. When I transfer the plants into this RDWC system, I cut the bottoms off of my 6" bucket lids that are attached to this system. The reason why I do this is so I can fit my 5" net pots from my VEG-A system right into the 6" bucket lids. This means that my roots hang directly in the solution and the solution never touches the pot itself in any way.

The plants varied in heights from 9” – 12.25”. The smaller plants were put into the middle of the system and the larger plants were placed on the outer buckets in the system. I don’t like to put them right into 2,000 Watts HPS, so I use 2 Lumatek dimmable ballasts and turn both 1000 watt ballasts down to the 600 watt setting and still use the 1000 watt Hortilux bulbs. The bottom of the reflector is 64.5” away from the top of the 6” bucket lids. I don’t lower the lights at all and I let the plants grow toward the light instead. The goal is to Veg the plants to 16” and then just pinch the main top and put them right into flower under 2000 Watts HPS. In my experience this will take up to 7 days to occur under 2 x 600 Watts HPS. If I were to put them under 2000 Watts HPS now, the plants would grow faster and I would be able to put them into flowering a few days earlier but I like to let the plants get use to their new home so I don’t add any stress to the equation. Stress can lead to major root problems in RDWC so the less stress that you add the better.

This specific system for me contains 44 Gallons of water. Before I added the plants in, I poured 44 Gallons of tap water into the system. My tap water is 40 TDS (500 conversion scale) and has a pH of 6.8. After I put in the water, I added:

250 mL General Hydroponics Micro
375 mL General Hydroponics Bloom
1 mL Clorox Bleach

That brought my pH down to 5.8 and my TDS was at 700 (500 conversion scale). I didn’t have to add any pH up or down and I always keep my pH in the range of 5.8 – 6.2 at all times. Regardless of what other people tell you on this site, going below a pH of 5.8 or above 6.2 in RDWC can cause lockouts which can cause stress and lead to major problems so it is very important to stay at these pH levels at all times. Lots of growers think that your pH will always rise as plants are eating but it is not always true. A lot of times it works out that way but when you set your pH below 5.8, it doesn’t always make it back up to 5.8 in a timely manner and can lead to major problems that can cause you to lose your crop within days in extreme cases. I am using a 700 Gallon Per Hour In-Line water pump and my system holds 44 Gallons of water so the system re-circulates every 3.77 minutes which is better than any system on the market. My Alita-80 Air Pump is rated at 85 Liters per minute. Now that we are in RDWC is where the fun begins and you will see how extreme the growth rates are.

Date: December 25, 2011
Stage: Day 1 Veg-B
Heights: 9" - 12.25"
Top Off: 44 Gallons
pH pre: 6.7
Added (pH): n/a
pH post: 5.8
PPM pre (500 scale): 40
Added (ppm): 250 mL Micro, 375 mL Bloom, 1 mL Clorox Bleach
PPM post: 700
Water Temperature: 73
Air Temperature: 65 - 76F
rH: 65
CO2: None
Pump Cycle: 24/7
Other Information: plants put into RDWC under 2 x 600 Watt HPS. Water level is set to 1" up the net pot.

Choosing the correct Air Pump to use
From the testing that I have done I have figured out the minimum required air that you will want to use. In these calculations I’ve taken into account that depending on your environment, your water temperatures will vary. The warmer the water is, the less Dissolved Oxygen that it can hold. I make my calculation in Liters so we will think about it this way here. Each 5 Gallon bucket in the system that you choose to build, will hold a maximum of 4 Gallons of water and in terms of Liters, that would be 15 Liters. Now you want to multiply the amount of buckets that you are going to use by 15 Liters. For example if you are using the 12 plant system, then you multiply 15 Liters x 12 buckets, which would give you 180 Liters. For whatever application that you choose to use, you want to use an air pump rated at half of those liters per minute. So in a 12 plant system you want a pump rated around 90 Liters per minute. You do not have to enter the control bucket into your calculations because the waterfall that is created by the water pump going into the controller supplies all the Dissolved Oxygen that you need. If you are using more than 6 buckets, I would suggest that you spend the extra money and get the Alita brand air pumps. They really are top of the line and it is a minimum expense for what you are going to get out of your yield and product. If you want to go the cheaper route, then any air pumps rated at the calculations above will work.

Choosing the correct Water Pump to use
Personally I like the water in my system to re-circulate at least every 5 minutes. This keeps your nutrient and pH in the system consistent. Most in-line pumps in my area are rated in Gallons Per Hour so we will use Gallons in our calculations here. Each bucket in the system holds a maximum of 4 Gallons of water. So we will take that number and multiply by the number of buckets that you have. For example in a 12 plant system, we have 13 buckets of water so we multiply that by 4 Gallons per bucket and get 52 Gallons. We want the water to re-circulate at least every 5 minutes and there are 12 five-minute periods in an hour, so we multiply 52 Gallons by 12 Cycles to get 624. This means that you want an in-line water pump that is rated for at least 624 Gallons Per Hour.

Chlorine as a preventative measure
I won’t tease you guys with my knowledge on Chlorine and everyone who doesn’t use live nutrients or supplements in hydroponics, I would advise you to keep a residual level of 0.50 PPM Chlorine at all times as a preventative measure against plant pathogens and future root problems. Always remember that too much Chlorine will kill your plants and you never want to put more than 1.0 PPM of Chlorine for large healthy plants. Cuttings and smaller plants are more sensitive to Chlorine and you will want to keep only 0.50 PPM of Chlorine so that you don’t risk killing them. My dropper gives 22 drops / 1 mL of liquid. Before giving Chlorine to small reservoirs you will want to see how many drops per mL your dropper gives so you give a safe amount of Chlorine. My dropper gives a 0.50 PPM of Chlorine at the rate of 1 drop of Clorox Bleach / 2 Gal. To give 0.50 PPM of Chlorine using Clorox Bleach, the equation is 1 mL of Clorox Bleach / 44 Gallons. Always take into account if your tap already has Chlorine in it and adjust your equation. Remember in a well aerated solution, Chlorine naturally disappears in 3-4 days so add in your Chlorine every 4 days as a preventative measure against future root and pathogen problems. Add this to your normal schedule and you will see how hard it is to get root problems again.

How high to hang your reflector
All hoods are different and you would have to find the sweet spot with a light meter. The way that I find my sweet spot is to pay attention to the 4 corners that the light is going to cover. Pretend that there is a grid there. Start at around 36" for the height of your reflector and put your meter on the tray where the 4 corners would be on the imaginary grid. You can actually make a grid with a 4x4 flattened cardboard box. This is what I do. You will have to adjust where the light goes when all 4 corners read the same number on your light meter. Now your light is centered.

Now you have to see how high your reflector should be from the tops of the plants. Keep lowering your reflector on toward your 4 foot grid. Put your light meter on the on the corners of your 4 foot grid and keep lowering your reflector and you will see the numbers on your light meter rise. When the numbers on the 4 corners of the 4 foot grid start going down, then you have gone too far. Now take a measurement of how high the reflector is from the grid. This is how high your reflector should be from the very top of your plants when they are fully grown.

pH
pH is very important when you are growing cannabis. Growing cannabis in soil and growing plants hydroponically require totally different pH’s so don’t be confused by this. I will only talk about pH in RDWC with hydroton as a medium here. You want to stay in a range of 5.8 – 6.2 at all times. Falling below or above this mark can cause serious problems. If your solution is not pH’d to the correct numbers, then the plants will not be able to receive and use the nutrients that you are supplying to them.

I have a lot of experience with many company's pH and TDS / PPM meters. When you buy one of these devices from a grow shop it usually means that you did not buy an expensive lab grade model and the result is that your device is made with cheaper components. I understand that most growers don't have thousands of dollars to buy a lab grade meter and this is ok but there are some things that you must know. With my testing with Hanna, Nutradip and Blue Lab I see similar problems in them that can give you a false reading.

Just because you might have a top of the line pH meter (pH meter is a necessity in hydroponics) doesn’t mean that the reading that it is giving you is correct. There are a few factors that will give you a false reading. Here is a list:

1. Calibration Solution
Your calibration solution is contaminated, old or was stored in high temperatures or exposed to light for too long.

2. Gunk
There is a build up of gunk on the pH probe. Solution: Gently clean the probe with a soft brush and recalibrate.

3. pH probe is broken or it’s beyond its life span
Buying pH meters at grow shops is an economical way of acquiring a meter but it is not lab grade and cheaper components are used in the process. pH probes can damage very easily and are also sensitive. When the pH probe is not being used, it is very important to keep it in 7.0 calibration solution. When you open the box for the first time from buying the meter, there is not always solution attached to the bottom of the probe but it is dipped in some sort of salt so don’t be confused by this and think that you can store your probe without solution. Your probe will eventually dry up and break if you were to dry it out. It is very simple to know if you have a damaged probe. This process will require 2 different calibration solutions (pH 4, pH 7 or pH 10). Most meters that I’ve seen in the US use pH 4 and pH 7. Your owner’s manual will tell you if you have to use the 7 or the 4 first. It is important to listen to what the company of the specific meter that you have tells you. If your meter does not contain a computerized calibration method then you will see that you calibrate it with a screw driver or there are knobs that you turn or you may have to digitally punch in numbers to a screen on your device. If your meter calibrates to a screw driver or some sort of knob that you turn then it is important for you to know that when you pH the 4 first and finish, you then clean the probe and insert it into the pH 7 calibration solution. If you insert the probe into the 7 and it doesn’t read pH 6.8, 6.9, 7.0 or 7.1, 7.2 (normally I wouldn’t insert the 6.8 or 7.2 in here but the meters at grow shops are not lab grade and have a greater margin of error), then your probe has gunk on it or is broken and needs to be replaced. You can try to recalibrate it but it will not work because it will move the pH 4 somewhere else and you’ll keep going back and forth just wasting time. You will usually have to do some tweaking going back and forth between the pH 4 and 7 solution because there is a lot of little spaces between 4.0 - 4.1 and 3.9 - 4.0 as well as 6.9 – 7.0 and 7.0 – 7.1. Once you get the meter to read 4.0 and 7.0, then your meter will be accurate for at least that usage but you should calibrate your meter once a week to be safe. Your meter is a computer and you can’t just trust the numbers that it is spiting out at you. Always question the reading that you are getting and compare it to what your plants are telling you. The first signs that you will usually see first, if your probe goes out of alignment, is yellowing of the edges of fan leaves (Magnesium Lockout) or brown / black spots on leaves (Calcium Lockout). If you have the solution up to the required PPM and you see these signs on the leaves, then that should be a big read flag and will require you to calibrate your probe or check if it is broken and get a working one. You will notice within a period of time, the pH of your solution will fluctuate. Depending on what different things that you add to your Rez can make the fluctuation different so if your solution normally rises and then you add something else to the mix and then it does the opposite then it’s good to keep this in mind. If you know that your solution rises, then set your solution to 5.8 and let it climb to 6.2 and then pH it down, if your solution falls, then set it to 6.2 and let it fall down to 5.8 and pH it back up. This fluctuation should not peak within a 24 hour period with most nutrients so if you see this happen you most likely have root problems (root rot / pythium) or some sort of pathogen, fungus or algae. We will cover this in another chapter.

4. RF interference from your digital/electronic ballast
RF interference has a major affect on many pH / TDS / PPM meters that are sold at grow shops. It is important that your ballasts and any equipment that gives off RF is turned off before calibrating and using your meter. I have spent countless hours on the phone with the owners of these company's complaining about how the RF interference from my ballasts are affecting my reading and they would send me brand new meters that would have the exact same problem. Make sure all your equipment is turned off when using your meters.

Feeding
Variety of strains requires different amounts of nutrient levels. This is why you wouldn’t want to grow multiple types of strains in the same system at the same time. If you have some heavy feeding strains mixed with underfeeding strains, it would be impossible to meet the needs of both types at once. For this purpose, it is always best to have all your plants in each system from the same mom in clone form. Of course you can grow similar feeding strains together but you would not maximize the yield of the grow and this is about maximizing your grow.

Overfeeding can cause lack of flavor in your final product and usually does. I will explain how to learn what your plants want by using your EC/TDS/PPM meter. Having one of these meters is a necessity when growing hydroponically and if you don’t have one you are flying blind. Always make sure that your meter is calibrated and that you check re-calibrate the meter every 2 weeks and when you see potential problems going on. Most grow shop meters are made with cheap components and are not lab grade so reading can be off frequently throughout your grow.

I believe in growing in sterile growing systems at all times. This doesn’t mean that growers who do use live nutrients or suppliments are wrong but this isn’t what this manual is about. Things can go wrong real fast in hydroponics and potentially kill your whole crop within days. Because of this I use refined nutrients and the brand that I like to use is General Hydroponic Flora Series. I enjoy the results that I get with this product but I mainly use it because I can keep my pH more stable with it compared to some other brands. Whatever brand you choose you will notice how the pH acts and if it swings too much you can try another brand and see what works for you. When I use GH Flora, I only use the Micro and the Bloom. The Micro has all the nitrogen that you need in your grow. In my grows it doesn’t matter if I’m in Veg or Flower, I use the Flora series in the exact same rates but if you choose to use another brand then you will have to experiment until you find the right rates that work for you. The rates that I use for GH flora series is 1 part micro to 1.5 parts bloom. You will first have to test all your clones in the same system to see how these plants eat so you can maximize the yield without burning them and ruining your flavor. The way that I do this with my nutrients is once I have roots, I start with a low PPM around 300. I keep data and write down what the PPM is every day once I top off the rez to the same point that it was when I first put the nutes in when it was 300. What I want to see is the PPM come down but not real fast. If your meter is reading 240 in 3 days then I would raise the solution to 360 and continue to record this data. I know that I am where I want to be when the meter is only going down 010 ppm per day. I like to look over a 3 day period cause it is hard to see 10-20 PPm per day as opposed to 60 ppm over a 3 day period. If the PPM is not going down then you are too high so when you raise it you don’t want to go too high or you’ll have to change out your system and nute at a lower level. As your plants are growing, you are recording the data that you get and when it reaches the levels of 10-20ppm of a decrees per day, then you know how much to use on your future grows with that pheno.

Throughout the years I’ve learned to keep it as simple as possible and don’t be fooled by variety of high priced snake oils that the grow shop has to offer. Cannabis doesn’t require as much as most growers think and a lot of new growers and even people who have years of growing experience make the mistake of following the directions on nutrient bottles. This can fry your plants.

Snype's RDWC Turorial!


This is the updated version of my RDWC system. I will have a tutorial finished in the month of August. It will be listed in my signature and in the hydro section. You can build this system for roughly $500 and that includes your pumps. The only thing it doesn't include is the heavy duty tomato cages. Stay tuned to, "Snype's RDWC Turorial!" in my signature....
 
Last edited:

Snype

Active member
Veteran
i'm subbed for this....

plus i've been wanting to try rdwc or uc....
It's nice to see you d3. RDWC is simply amazing when you know what rules to follow. As you may know, RDWC systems at stores can be very expensive. In August I will have a tutorial and you will be able to build a better system than what the market has to offer. It will only cost you roughly $450 to build my new updated version of the system. That price does not include heavy duty tomato cages. I have tested other companies systems and was simply not impressed for what they cost. There have been many updates on the system that you see here in these pictures so take that into account.
 

Snype

Active member
Veteran

This is Day 7 Veg B and all the plants were topped and the ballasts were also all switched to the 1000 Watt setting after I topped the plants. Before I topped the plants, they all varied in heights from 14.5” to 18”. I want to achieve an even canopy so on the smaller plants I just pinched the very top growth so that I did not lose any heights on them. For the plants that were taller than 17”, I just cut the main growth down to 17” which was mostly the plants on the ends. This is the last day of the Veg cycle and the next morning they will be put under 12 hours dark and 12 hours light and begin the Flowering Period. This is the point when these plants will really stretch and take off. The plants are all 17” and under and going into flowering but they will still reach around 50” by the end of flowering in my experience. I made a chart years ago where I keep all my data so I can see what is actually going on and to teach me about each plant that I grow and I learn so much from these charts. Here is the information that I keep track of in my data charts:

Date: December 26, 2011
Stage: Day 2 Veg-B
Heights:
Top Off: 4 Gallons
pH pre:
Adeed (pH): n/a
pH post:
PPM pre (500 scale):
Added (ppm):
PPM post:
Water Temperature: 73
Air Temperature: 65 - 76F
rH: 62
CO2: None
Pump Cycle: 24/7
Other Information: Y-Filter cleaned out.

Date: December 28, 2011
Stage: Day 4 Veg-B
Heights:
Top Off: 3 Gallons
pH pre:
Adeed (pH): n/a
pH post:
PPM pre (500 scale):
Added (ppm):
PPM post:
Water Temperature: 73
Air Temperature: 65 - 76F
rH: 60
CO2: None
Pump Cycle: 24/7
Other Information:

Date: December 31, 2011
Stage: Day 7 Veg-B
Heights: 14.5" - 18"
Top Off: 0
pH pre: 6.0
Adeed (pH): n/a
pH post: 5.7
PPM pre (500 scale): 570
Added (ppm): 100 mL Micro, 150 mL Bloom, 1.5 mL Clorox Bleach
PPM post: 660
Water Temperature: 73
Air Temperature: 65 - 76F
rH: 56
CO2: None
Pump Cycle: 24/7
Other Information: Plants were all topped to 17" tall. Smaller plants were pinched to save heights. Lights set to 1000 Watt HPS. Y-Filter cleaned out. New line marked in controller and this is new set point.
 
Last edited:

Snype

Active member
Veteran

This is Day 7 Flower and everything is going as planned. The plant heights vary from 22.5” to 25.25”. From the point that I flipped the lights to 12/12, the plants grew 8.25” and that was in 7 days. Like I said before these plants will stretch to 50” by day 30. This specific phenotype in the RezdogDD grows this way in these conditions. Most strains that I grow do not perform this way in terms of the amazing stretch that this specific phenotype has and this is what I was looking for from all the plants that I tested. Every day, I make sure to tuck the branches into the tomatoe cages so that they have support. Remember that I just took the main top off of the plants and nothing else. The majority of the bottom branches are becoming tops now and each plant should have at least 8 tops and that is where the majority of my bud is going to come from. In this system the plants grow much faster than normal and the leaves get a lot bigger than I’ve ever seen as time goes on. I have not added any CO2 yet but I always add my CO2 at day 14 Flower and we are still a week away from that. In my experience I do not see any added benefit of using CO2 before 14 days of Flowering but I’m not here to debate that with anyone cause we all have different experiences with this special plant that we grow. Anybody, including people who have never grown can learn everything they need to know to do exactly what I do with success. One of my goals is to have my logs so detailed that make the reader more comfortable and have more confidence in making the switch to RDWC. I believe that a lot of you have a similar goal in the end and for any newbies, it’s not as complicated as you may think. Here is the data:

Date: January 2, 2012
Stage: Day 2 Flower
Heights:
Top Off: 5 Gallons
pH pre: 5.8
Adeed (pH): 10 mL pH Up
pH post: 5.7
PPM pre (500 scale): 570
Added (ppm): 150 mL Micro, 225 mL Bloom
PPM post: 810
Water Temperature: 74
Air Temperature: 65 - 76F
rH: 60
CO2: None
Pump Cycle: 24/7
Other Information:

Date: January 3, 2012
Stage: Day 3 Flower
Heights:
Top Off: 2.5 Gallons
pH pre: 5.7
Adeed (pH):
pH post: 5.7
PPM pre (500 scale): 790
Added (ppm):
PPM post: 790
Water Temperature: 68
Air Temperature: 60 - 73 F
rH: 38 - 56
CO2: None
Pump Cycle: 24/7
Other Information: Cleaned out Y-Filter

Date: January 4, 2012
Stage: Day 4 Flower
Heights:
Top Off: 2.5 Gallons
pH pre: 5.7
Adeed (pH):
pH post: 5.7
PPM pre (500 scale): 760
Added (ppm):
PPM post: 760
Water Temperature: 66
Air Temperature: 58 - 73 F
rH: 38 - 56
CO2: None
Pump Cycle: 24/7
Other Information: Tucked branches into cages.

Date: January 6, 2012
Stage: Day 6 Flower
Heights:
Top Off: 6 Gallons
pH pre: 5.6
Adeed (pH): 15 mL pH Up
pH post: 5.8
PPM pre (500 scale): 680
Added (ppm):
PPM post: 690
Water Temperature: 66
Air Temperature: 58 - 73
rH: 38 - 56
CO2: None
Pump Cycle: 24/7
Other Information: Tucked branches into cages.

Date: January 7, 2012
Stage: Day 7 Flower
Heights: 22.5 - 25.25
Top Off: 0
pH pre:
Adeed (pH):
pH post:
PPM pre (500 scale):
Added (ppm): 1.5 mL Clorox Bleach
PPM post:
Water Temperature: 56 - 71
Air Temperature: 51 - 74
rH: 38 - 62
CO2: None
Pump Cycle: 24/7
Other Information: Tucked branches into cages.
 
Last edited:

Snype

Active member
Veteran

This is day 14 Flower and plants range in heights between 34” – 36”. I have had 0 problems with these plants and everything is going as planned like usual. This week the plants have all grown an average of 11” in the last 7 days. With my experience with this strain in this specific system, plant growth will continue this fast with their stretch for at least another week and then growth will start to slow down. I still expect these plants to grow somewhere around 50”. I continue to tuck any branches into the tomato cages on a daily basis. Every 7 days I continue to add Clorox Bleach into the system and because of that I’ve had 0 problems. The plants are drinking about 4 Gallons of solution every day. Today is the day that I added my CO2 to the room and I have it set to 600 PPM. Because it is very cold now, I don’t have the luxury of keeping room temperatures in the high 70’s or low 80’s to take advantage of using higher CO2 levels. At lower temperatures, adding high CO2 levels is just a waste of money and CO2 and this is why my levels are at 600 PPM. Today is also the day that I add my first dose of General Hydroponics Liquid Kool Bloom. After I took pictures of the plants, I pruned the majority of bottom branches as well as some branches in the middle of the plants that weren’t going to get adequate light. Now the plants will focus their energy on the main tops of the plants and bud production will start a lot better. I don’t like to prune branches before Day 14 of Flower and I also don’t prune branches after day 16 of Flower. Pictures will never do these plants justice and things always look much better in person. The leaves in this system grow much larger than normal so it’s harder to tell in pictures how big the plants really are. As long as I have minimal problems, there is no way that this crop will be less than 3.5 pounds when these plants are done and that is a low estimate because of the cold. I’m hoping to get over 4 pounds but I’m a little scared about how cold it is so I have no idea how this grow is going to go. I would expect that I will have a denser bud in the end and also have more trichome production because of the cold weather but it is possible that I could lose some weight to the cold but I really have no idea. I do know though that this should be a better crop than normal as far as the quality goes and look of the buds due to the cold weather. My best looking crops always come in the winter time. Here is the data for today but there is much more data from the other days that aren’t included in this post but I will be sure to include it at the end of this log:

Date: January 8, 2012
Stage: Day 8 Flower
Heights:
Top Off: 6.5 Gallons
pH pre: 5.8
Adeed (pH): 5 mL pH Up
pH post: 5.8
PPM pre (500 scale): 600
Added (ppm): 100 mL Micro, 150 mL Bloom
PPM post: 770
Water Temperature: 56 - 71
Air Temperature: 51 - 74
rH: 38 - 62
CO2: None
Pump Cycle: 24/7
Other Information: Tucked branches into cages. Turned off AC for good cause its too cold.

Date: January 10, 2012
Stage: Day 10 Flower
Heights:
Top Off: 8 Gallons
pH pre: 5.7
Adeed (pH): 5 mL pH Up
pH post: 5.8
PPM pre (500 scale): 680
Added (ppm):
PPM post: 690
Water Temperature: 56 - 75
Air Temperature: 51 - 78F
rH: 38 - 72
CO2: None
Pump Cycle: 24/7
Other Information: Tucked branches into cages. Cleaned out Y-Filter.

Date: January 12, 2012
Stage: Day 12 Flower
Heights:
Top Off: 6.5 Gallons
pH pre: 5.9
Adeed (pH):
pH post: 5.8
PPM pre (500 scale): 590
Added (ppm): 100 mL Micro, 150 Bloom
PPM post: 770
Water Temperature: 53 - 75 F
Air Temperature: 47 - 78 F
rH: 38 - 72
CO2: None
Pump Cycle: 24/7
Other Information: Tucked branches into cages.

Date: January 13, 2012
Stage: Day 13 Flower
Heights:
Top Off: 0
pH pre:
Adeed (pH):
pH post:
PPM pre (500 scale):
Added (ppm):
PPM post:
Water Temperature: 53 - 75 F
Air Temperature: 47 - 78 F
rH: 38 - 72
CO2: 600 PPM
Pump Cycle: 24/7
Other Information: CO2 added

Date: January 14, 2012
Stage: Day 14 Flower
Heights: 34" - 36"
Top Off: 8 Gallons
pH pre: 5.8
Adeed (pH):
pH post: 5.9
PPM pre (500 scale): 630
Added (ppm): 100 mL Micro, 150 mL Bloom, 200 mL Liquid Kool Bloom, 2 mL Clorox Bleach
PPM post: 910
Water Temperature: 53 - 75
Air Temperature: 47 - 78 F
rH: 38 - 72
CO2: 600 PPM
Pump Cycle: 24/7
Other Information: Pruned bottom branches
 
Last edited:

Snype

Active member
Veteran

This is day 21 of Flower and the plants range in heights from 44” to 47.5”. As you can see the plants have grown a lot since I put them into flower and this is the point where growth will start to slow but they will still continue to grow for at least another week but at a slower rate. It’s been a pretty simple grow so far but it usually is in this system and with this strain. You all see I’m only using a few products and I’m not dumping 10 different supplements into the system. These plants don’t need as much as a lot of people think and when you dump in more products, it can lead to more problems. General Hydroponics Flora Series has everything that you need in it already to produce amazing results. I remember back in the day when I refused to buy General Hydroponics because the price was too cheap and I thought that those expensive other nutes were expensive because they were good. I grew up since then and am happy I found General Hydroponics. I’ve been trying not to change out the system and just add back but for the most part this is just not possible. After about 3 weeks, the salts have problems and the plants stop eating. I think that I have a better idea of what is going on now with these salts after seeing it in action in my many data logs that I have. It seems like with the way that I add back to my system, I don’t have to change out the system until the top off is equal to twice what the system equals. For example, if my system holds 40 gallons, then after I add back 80 gallons, then I can change it out. If I have any problems before the 80 gallon mark comes then I change out the system that day. I usually see problems in the form of plants not eating. When I see this happen, it usually comes when I’ve added back more than 80 gallons. What I think that is going on is that these salts can’t have too much of certain other salts to work properly so when I add back to the system, there can be a build up of certain salts that the plant doesn’t eat as fast which makes certain other nutes lock out from the plants. Keeping data really does help you see things in a better way and come to better theories and conclusions to many problems that you have. You can’t learn it all from one data log and you need many months of data to form opinions and theories and conclusions. Everybody who does this for a living should keep data if they are doing this for the right reasons. I medicate with my crops and I want to make sure that people who medicate with my products don’t have a product packed with chemicals and hormones. There’s enough chemicals and hormones already in the food that most of you eat and it is ruining our lives but most of people don’t realize it. We are being attacked from all angles. I make sure that everything that I eat or put on my body contains no hormones or chemicals. Life is more expensive this way but it makes me feel much better and I don’t have to worry about poisoning myself with all that shit. I’m sure this subject bores most people but I can go on forever about these types of subjects. If anyone is confused of any of the data, please ask me any questions. It can be a little confusing on certain days. Anyway here is the data:

Date: January 16, 2012
Stage: Day 16 Flower
Heights:
Top Off: 7 Gallons
pH pre:
Adeed (pH):
pH post:
PPM pre (500 scale):
Added (ppm):
PPM post:
Water Temperature: 57 - 75 F
Air Temperature: 50 - 78 F
rH: 45 - 73
CO2: 600 PPM
Pump Cycle: 24/7
Other Information:

Date: January 18, 2012
Stage: Day 18 Flower
Heights:
Top Off: 7 Gallons
pH pre: 6.1
Adeed (pH):
pH post: 6.1
PPM pre (500 scale): 730
Added (ppm):
PPM post: 730
Water Temperature: 57 - 75 F
Air Temperature: 50 - 78 F
rH: 45 - 73
CO2: 600 PPM
Pump Cycle: 24/7
Other Information:

Date: January 19, 2012
Stage: Day 19 Flower
Heights: 42" - 45"
Top Off: 3 Gallons
pH pre: 6.2
Adeed (pH):
pH post: 6.0
PPM pre (500 scale): 700
Added (ppm): 100 mL Micro, 150 mL Bloom
PPM post: 880
Water Temperature: 55 - 75 F
Air Temperature: 50 - 78 F
rH: 45 - 73
CO2: 600 PPM
Pump Cycle: 24/7
Other Information: Little bit of gentle bending at the middle of the lights. Opened up plants under lights. Cleaned out Y-Filter.

Date: January 21, 2012
Stage: Day 21 Flower
Heights: 44 – 47.5”
Top Off: 9 Gallons
pH pre: 6.0
Added (pH): n/a
pH post: 6.1
PPM pre (500 scale): 780
Added (ppm): 12 tsp Liquid Kool Bloom / 2 mL Clorox Bleach
PPM post: 800
Water Temperature: 55 - 75 F
Air Temperature: 50 – 78 F
rH: 45 - 77
CO2: 600 PPM
Pump Cycle: 24/7
Other Information: Very light bending at center of lights
 
Last edited:

Snype

Active member
Veteran
Day 28 continued

This is day 28 of the Flowering cycle. The plants are now between 46" - 49.5" and the plants should only grow just for the next few days but at a very slow pace. This is the phase where the stretch pretty much slows down and holds around these numbers. From the point that I put the plants into the flowering stage, they have grown 32.5" and have almost tripled in heights from the stretch. The plants are all looking beautiful and healthy and bud development is really starting to kick in. From my experience with this strain, the next week is when the plants will really start to pack on buds. Resin production is coming in nicely also. Havent had any real problems as of yet and everything is going as planned. This system really kicks ass and you can see this from the pictures. The branch structures are looking very nice and the branches are stronger than usual and this may be due to the cold temperatures. There is also more resin production here than normal which also may be due to the cold temperatures. Here is some new and past data:

Date: January 23, 2012
Stage: Day 23 Flower
Heights:
Top Off: 12 Gallons
pH pre: 6.2
Added (pH): n/a
pH post: 6.1
PPM pre (500 scale): 690
Added (ppm): 100 mL Micro, 150 mL Bloom
PPM post: 860
Water Temperature: 55 - 75 F
Air Temperature: 50 – 78 F
rH: 44 - 77
CO2: 600 PPM
Pump Cycle: 24/7
Other Information: Very light bending at center of lights.

Date: January 25, 2012
Stage: Day 25 Flower
Heights: 45" – 49"
Top Off: 8 Gallons
pH pre: 6.1
Added (pH): n/a
pH post: 6.1
PPM pre (500 scale): 770
Added (ppm):
PPM post: 770
Water Temperature: 55 - 75 F
Air Temperature: 50 – 78 F
rH: 42 - 77
CO2: 600 PPM
Pump Cycle: 24/7
Other Information: Very light bending at center of lights.

Date: January 27, 2012
Stage: Day 27 Flower
Heights:
Top Off: 10 Gallons
pH pre: 6.0
Added (pH): n/a
pH post: 5.9
PPM pre (500 scale): 700
Added (ppm): 100 mL Micro, 150 mL Bloom, 12 tsp Liquid Kool Bloom, 2 mL Clorox Bleach
PPM post: 930
Water Temperature: 55 - 75 F
Air Temperature: 50 – 78 F
rH: 44 - 77
CO2: 600 PPM
Pump Cycle: 24/7
Other Information:

Date: January 28, 2012
Stage: Day 28 Flower
Heights: 46" – 49.5"
Top Off: 5 Gallons
pH pre: 6.0
Added (pH): n/a
pH post: 6.0
PPM pre (500 scale): 860
Added (ppm):
PPM post: 860
Water Temperature: 55 - 75 F
Air Temperature: 50 – 78 F
rH: 42 - 77
CO2: 600 PPM
Pump Cycle: 24/7
Other Information:
 
Last edited:

Snype

Active member
Veteran
Day 35 Flower continued

This is day 35 of the Flowering stage and the plants range in heights from 47-50". The cannopy is really even and the plants grew to perfect heights for how high my reflectors are hung. I dont have access to the reflectors and usually the plants grew too high in the past but ive been keeping track of the data and now know exactly what point to top them and flip them. In the past I was too scared to top them and put them right into flower. With this specific pheno and strain, they stretch so much that I have to slow them down by putting them right into flowering the morning after, instead of a few days after. It works out better this way because it takes down the VEG time.

Because my tomato cages are so small, I had to put up Mason line to hold the top frame of the plants. They are strong enough to hold themselves up now but as the buds continue to grow they can really weigh down the plant and make the branches flop over. I learned this the hard way in the past so now I set the mason line at day 35. If i wait until they flop over, it is more difficult to put the mason line in. Here is the data for the week:

Date: January 30, 2012
Stage: Day 30 Flower
Heights:
Top Off: 9 Gallons
pH pre: 6.0
Added (pH): n/a
pH post: 6.0
PPM pre (500 scale): 780
Added (ppm):
PPM post: 780
Water Temperature: 52 - 66 F
Air Temperature: 48 - 71 F
rH: 39-62
CO2: 600 PPM
Pump Cycle: 24/7
Other Information: CO2 tank changed out.

Date: February 1, 2012
Stage: Day 32 Flower
Heights: 47" - 50"
Top Off: 9 Gallons, ** 40 Gallon
pH pre: 5.7
Added (pH): n/a
pH post: * 5.6; ** 6.0
PPM pre (500 scale): 750
Added (ppm): *(275 mL Micro, 413 mL Bloom, 2 mL Clorox Bleach), ** 200 mL Liquid Kool Bloom
PPM post: 740*; 870**
Water Temperature: 57 - 67 F
Air Temperature: 51 - 74 F
rH: 41 - 70
CO2: 600 PPM
Pump Cycle: 24/7
Other Information: Cleaned out Y-Filter. Changed out complete system. Plants weren't eating. Confirming that something builds up in the nutrients and the plants cant access it even when I add back nutes.

Date: February 3, 2012
Stage: Day 34 Flower
Heights:
Top Off: 8 Gallons
pH pre: 6.0
Added (pH): n/a
pH post: 6.0
PPM pre (500 scale): 730
Added (ppm):
PPM post: 730
Water Temperature: 56 - 68 F
Air Temperature: 50 - 76 F
rH: 40 - 66
CO2: 600 PPM
Pump Cycle: 24/7
Other Information: Plants are eating great now! Most likely due to a build up of something after over 2x top off or salts fall apart. Once the system is changed out, everythig is fixed. I have noticed in the past logs that when this happens, the pH falls drastically over 3 days. 4.9 is common if system is not changed out.

Date: February 4, 2012
Stage: Day 35 Flower
Heights: 47" - 50"
Top Off: 0 Gal
pH pre:
Added (pH): n/a
pH post:
PPM pre (500 scale):
Added (ppm):
PPM post:
Water Temperature: 58 - 67 F
Air Temperature: 51 - 73 F
rH: 41 - 64
CO2: 600 PPM
Pump Cycle: 24/7
Other Information: Put in mason line to support outer branches.
 
Last edited:

kaneboy

Well-known member
Veteran
Welcome back snype ,What a great thread bud and that chem dd is beautiful keep it coming
 

OLDproLg

Active member
Veteran
ROCK it BROTHER!!

You hit it on the nail,with COLD TEMPS!!!
always see more resins an every strain......
Keep it comming,fine work man,get some finished bud up!
lg
 

Snype

Active member
Veteran
Day 42 Continued


Date: February 5, 2012
Stage: Day 36 Flower
Heights:
Top Off: 9.5 Gal
pH pre:
Added (pH): n/a
pH post:
PPM pre (500 scale):
Added (ppm):
PPM post:
Water Temperature: 57 - 67 F
Air Temperature: 51 - 73 F
rH: 43 - 65
CO2: 600 PPM
Pump Cycle: 24/7
Other Information:

Date: February 6, 2012
Stage: Day 37 Flower
Heights:
Top Off: 4.5 Gal
pH pre: 6.2
Added (pH): n/a
pH post: 6.0
PPM pre (500 scale):570
Added (ppm): 100 mL Micro / 150 mL Bloom / 1 tsp Kool Bloom Powder
PPM post: 790
Water Temperature: 57 - 67 F
Air Temperature: 51 - 73 F
rH: 42 - 73
CO2: 600 PPM
Pump Cycle: 24/7
Other Information:

Date: February 8, 2012
Stage: Day 39 Flower
Heights:
Top Off: 11 Gal
pH pre: 6.0
Added (pH): n/a
pH post: 6.0
PPM pre (500 scale):550
Added (ppm): 100 mL Micro / 150 mL Bloom / 1 tsp Kool Bloom Powder
PPM post: 720
Water Temperature: 58 - 68 F
Air Temperature: 48 - 75 F
rH: 43 - 72
CO2: 600 PPM
Pump Cycle: 24/7
Other Information:

Date: February 10, 2012
Stage: Day 41 Flower
Heights:
Top Off: 10 Gal
pH pre: 6.2
Added (pH): 100 mL Micro / 150 mL Bloom
pH post: 6.0
PPM pre (500 scale):610
Added (ppm): 100 mL Micro / 150 mL Bloom
PPM post: 820
Water Temperature: 51 - 63 F
Air Temperature: 43 - 68 F
rH: 38 - 62
CO2: 600 PPM
Pump Cycle: 24/7
Other Information: Cleaned out Y Filter. Plants are very healthy!

Date: February 11, 2012
Stage: Day 42 Flower
Heights: 47"-50"
Top Off: 0 Gal
pH pre:
Added (pH):
pH post:
PPM pre (500 scale):
Added (ppm):
PPM post:
Water Temperature: 55 - 69 F
Air Temperature: 52 - 77 F
rH: 45 - 68
CO2: 600 PPM
Pump Cycle: 24/7
Other Information: All hairs are still white and production looks great. Point of peak flourecence.
 
Last edited:
Top