so it's been done a million times. but i already documented it, and i'm really happy with how it came out, so i'm gonna post it up.
the great thing about this design is that it is easy to refill, easy to scale up or down, and it looks clean and sexy.
materials
1/4" mesh screen
8">6" reducing duct
6" duct end cap
8" duct end cap
6" hose clamp
8" hose clamp
sheer leggings
activated carbon
gorilla glue
tools
snips or clips
screw driver
broom handle (for packing the carbon)
first of all, i used probably 70% petco brand carbon, which comes in pretty large pellet size, and only later (after running out half way through) realized that the brand name stuff is a much more suitable grain.
now my reason for the sizing was based on my 8" in-line can fan. you could easy scale this up or down for whatever size application you have. for the purpose of this tutorial i'll talk about my materials.
okay start with your 6" end cap.

to figure out how much mesh to cut for your inner screen, wrap it around the 6" end cap, allow for at least a 4" overlap, and mark where to cut with a piece of tape.

i didn't want a 24" long filter, so i also cut it down length wise to 12". the collars on the reducer and the end cap will take a few inches off that, but i'll still have at least 8" of exposed screen in the end.
you'll want to fold over the pointy edge from where you cut in any places that will be exposed to the leggings to avoid snagging.

lightly wet the inside of the collar on the 6" end cap. apply a thin layer of gorilla glue, and let it sit for 5-10 minutes.
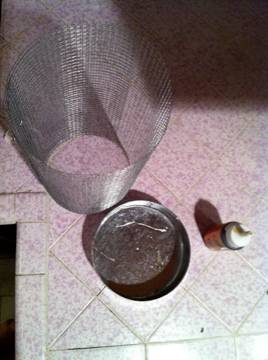
insert the mesh, and let it dry thoroughly.
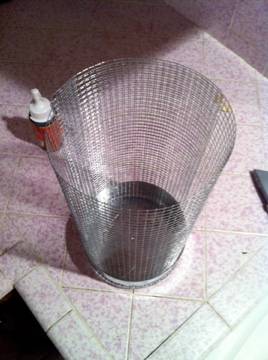
when it's dry flip it over and carefully stretch the leggings over the canister. the toe should be right in the center of the end cap. drop a 6" hose clamp over it to prepare for the next step.

slip the open end of the mesh over the 6" end of the reducer. fasten the hose clamp securely. next, carefully pull the waist band of the leggings over the hose clamp and all the way up to the top of the canister.
to measure the length needed for the outer screen, simply place the roll next to your inner screen, and mark an inch above the top (to allow you to fold over the pointed edge). the width is measured by wrapping the screen around the larger end of the reducer, leaving four inches of overlap.

after it's cut and the top edge is folded down, fasten the bottom edge around the reducer with the 8" hose clamp.

at this point i added a layer of tape around the top edge to futher protect the leggings from snagging.
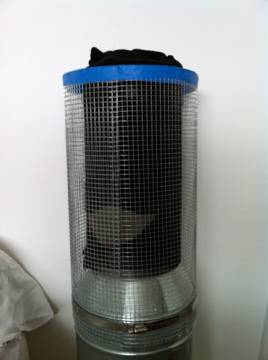
flip the waistband of the leggings over the rim. the extra leg can just be left hanging over the side.
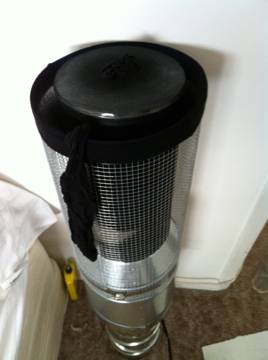
now get your carbon and your broom handle. the broom handle is just for packing the carbon. anything long and slender that won't snag the leggings will do.
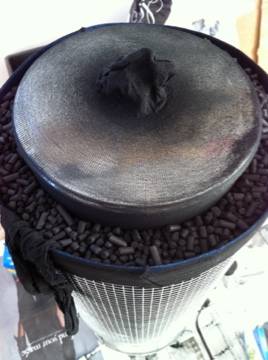
when it's stuffed nicely from the bottom to the brim, flip the leggings back up over the rim to secure the carbon.

now fit your end cap on. mine fit really snug and i didn't feel the need to use tape or anything, but feel free to secure it however you feel comfortable with.

there ya go! attach it to your fan and you're ready to rock! here's mine mounted on my sunleaves 8" can fan. the other end has another 8">6" reducer into an adjustable 90 degree elbow piece. that mounts under my cab, and the cool tube plugs right in! if i ever need to refill it, i can just pull it out, pop off the end cap, and replace the carbon!

i got it installed and running. i'll get a picture up tomorrow. the thing is purring silently. smooth like a caddy.
the great thing about this design is that it is easy to refill, easy to scale up or down, and it looks clean and sexy.
materials
1/4" mesh screen
8">6" reducing duct
6" duct end cap
8" duct end cap
6" hose clamp
8" hose clamp
sheer leggings
activated carbon
gorilla glue
tools
snips or clips
screw driver
broom handle (for packing the carbon)
first of all, i used probably 70% petco brand carbon, which comes in pretty large pellet size, and only later (after running out half way through) realized that the brand name stuff is a much more suitable grain.
now my reason for the sizing was based on my 8" in-line can fan. you could easy scale this up or down for whatever size application you have. for the purpose of this tutorial i'll talk about my materials.
okay start with your 6" end cap.
to figure out how much mesh to cut for your inner screen, wrap it around the 6" end cap, allow for at least a 4" overlap, and mark where to cut with a piece of tape.
i didn't want a 24" long filter, so i also cut it down length wise to 12". the collars on the reducer and the end cap will take a few inches off that, but i'll still have at least 8" of exposed screen in the end.
you'll want to fold over the pointy edge from where you cut in any places that will be exposed to the leggings to avoid snagging.
lightly wet the inside of the collar on the 6" end cap. apply a thin layer of gorilla glue, and let it sit for 5-10 minutes.
insert the mesh, and let it dry thoroughly.
when it's dry flip it over and carefully stretch the leggings over the canister. the toe should be right in the center of the end cap. drop a 6" hose clamp over it to prepare for the next step.
slip the open end of the mesh over the 6" end of the reducer. fasten the hose clamp securely. next, carefully pull the waist band of the leggings over the hose clamp and all the way up to the top of the canister.
to measure the length needed for the outer screen, simply place the roll next to your inner screen, and mark an inch above the top (to allow you to fold over the pointed edge). the width is measured by wrapping the screen around the larger end of the reducer, leaving four inches of overlap.
after it's cut and the top edge is folded down, fasten the bottom edge around the reducer with the 8" hose clamp.
at this point i added a layer of tape around the top edge to futher protect the leggings from snagging.
flip the waistband of the leggings over the rim. the extra leg can just be left hanging over the side.
now get your carbon and your broom handle. the broom handle is just for packing the carbon. anything long and slender that won't snag the leggings will do.
when it's stuffed nicely from the bottom to the brim, flip the leggings back up over the rim to secure the carbon.
now fit your end cap on. mine fit really snug and i didn't feel the need to use tape or anything, but feel free to secure it however you feel comfortable with.
there ya go! attach it to your fan and you're ready to rock! here's mine mounted on my sunleaves 8" can fan. the other end has another 8">6" reducer into an adjustable 90 degree elbow piece. that mounts under my cab, and the cool tube plugs right in! if i ever need to refill it, i can just pull it out, pop off the end cap, and replace the carbon!
i got it installed and running. i'll get a picture up tomorrow. the thing is purring silently. smooth like a caddy.


