What's new
  • ICMag with help from Landrace Warden and The Vault is running a NEW contest in November! You can check it here. Prizes are seeds & forum premium access. Come join in!

Almost finished with my Cab (suggestions?)

sideshow1

Member
Hello,

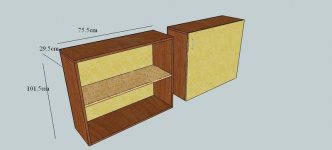
I have been working on finishing my flowering cab and am almost done. I was really seeing if anyone had any good advice for me. Here is a sketchup of the cab.
attachment.php


The shelf can be raised and lowered. I am mounting CFLs at the top on the back wall.

I was considering adding 2 3" passive intakes on the bottom left and my 120mm 85cfm fan to the top right.

I have all the materials to make the pencil holder carbon filter but am a little unsure how to keep the carbon or the inner container from falling out when I turn it side ways to mount it to the fan.

I am open for any and all suggestions. I dont want to start cutting and then get some great advice on how I should finish setting it up.

Thanks.
 

Attachments

  • Cab1Alabled2.jpg
    Cab1Alabled2.jpg
    20.8 KB · Views: 23

sideshow1

Member
The cab is painted completely flat white now. After several frustrating hours I think I have it light proofed. The weatherstripping was hard to figure out seeing as the door is warped a little. I hope it is good now.

I have a 4 socket bathroom light fixture that I am going to dismantle to wire in the cab. I am clueless on how to do this but I am going to try to figure it out.
 

StealthDragon

Recovering UO addict.
Veteran
I use a few of those pencil holder diy filters and I had a problem with the inner holder slipping out a bit so I put in 2 small screws from the outside through the rim connecting the 2 containers, is that what you meant? I can take a pic if ya want..I got a spare filter sitting right here...
 

sideshow1

Member
That is what I meant. You just put it right through the panty hose? I may give that a try. My exhaust fan is 120mm. The larger pencil holder just fits around the fan. Is that how it is supposed to be, or is the smaller holder supposed to just fit around the fan? I hope the former or else this may be no good.

I'll post a pic of the lights I am using shortly. And check this thread along the way in case I am going about it all wrong and someone sees it.
 

sideshow1

Member
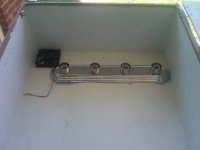
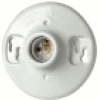
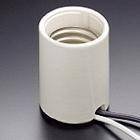
So I was seeing if I could wire these lights up, which I could (way easier than I thought). I was trying to see how I wanted to mount them (pic 1) But that got me thinking. I saw in Home Depot just the plastic fixture. (pic 2) And (pic 3).

I was going to go with the prewired because I wasnt confident in my abilites, but after looking at how it was done I think I could certianly do it.

The problem: The bathroom fixture was only $13. Some sockets are $2 some are $8. So I could come out cheaper and spread the lights out a little more if I got the $2 sockets. The problem is I may not be able to mount the sockets like they need to be mounted due to lack of mounting screws or whatever.

The bathroom fixture is for moist environments. I dont plan on having a ton of moisture, but I also dont want a fire.

I now come to the pros to ask for a suggestion. Just mount the lights at the width predetermined. (I could get the 3 socket which would reduce my cost my light and amount of space) or try to wire up some different sockets?
 

Attachments

  • IMG00175-20101008-1110.jpg
    IMG00175-20101008-1110.jpg
    23.8 KB · Views: 23
  • leviton-keyless-porcelain-lampholder-tp_7082771752618622864.png
    leviton-keyless-porcelain-lampholder-tp_7082771752618622864.png
    5.5 KB · Views: 28
  • fixture.jpg
    fixture.jpg
    2.6 KB · Views: 24

BC Chronic

Paging Dr.Greenthumb
Veteran
Hey!! nice setup!!
Yes I used silicone caulking but i must have taken that pic before..go to my new cab build in my albums to see lots of pics if you want...
I used a 1.5 inch drill bit for the intake holes..the ones they use to drill dead bolts...you can get them cheap...
there are 8 of those intake holes totalling 12 or so inches with a 4 inch exhaust hole...I went over the rule because of the heat in my cab...it works great!!
I also have a 3 inch intake with fan at the bottom to draw cool air in and up..lowered temps by 3 degrees!!!
Hope this helps but please feel free to keep asking us questions bro!!!
cant wait to see your cab in action!!!!!
take care
 

007.

Member
I used a 1.5 inch drill bit for the intake holes..the ones they use to drill dead bolts...you can get them cheap...
there are 8 of those intake holes totalling 12 or so inches with a 4 inch exhaust hole...I went over the rule because of the heat in my cab...it works great!!
I don't mean to be a dick at all, but you can't think of intake/exhaust like that. 8 x 1.5 inch holes is not double a 4 inch exhaust (I assume that's what you meant by "the rule", ie, passive intake should be double powered exhaust).

As you know, the formula for circle area is pi*r^2.

So your intake area is 8 * (pi * 0.75^2).

I use 0.75 because 1.5 is probably your diameter, not radius.

So that's 14.1 square inches.

Your exhaust is pi * 2^2, which is 12.6 square inches.

You might think about more intake if heat/co2 is ever an issue. Also if your exhaust fan is dimmable, you may be able to cut more holes to reduce drag and then turn down your exhaust if noise is a problem.

Your added computer fan is probably holding it all together fine though.


Sorry to derail, but knowledge is power!


To address the main thread: Those ceramic bathroom sockets don't really fit flush against the wall of the cab, since the wires get in the way. They're designed so the wires will go back into the wall, which may keep them from being the mounting solution you might think they'd be. If you can figure a way to mount the $2 sockets, that sounds great (maybe use a hole saw in a 2x4 or something at the width of the socket?). Otherwise I'd go with that vanity you've got in there now.
 

sideshow1

Member
I don't mean to be a dick at all, but you can't think of intake/exhaust like that. 8 x 1.5 inch holes is not double a 4 inch exhaust (I assume that's what you meant by "the rule", ie, passive intake should be double powered exhaust).

As you know, the formula for circle area is pi*r^2.

So your intake area is 8 * (pi * 0.75^2).

I use 0.75 because 1.5 is probably your diameter, not radius.

So that's 14.1 square inches.

Your exhaust is pi * 2^2, which is 12.6 square inches.

You might think about more intake if heat/co2 is ever an issue. Also if your exhaust fan is dimmable, you may be able to cut more holes to reduce drag and then turn down your exhaust if noise is a problem.

Your added computer fan is probably holding it all together fine though.


Sorry to derail, but knowledge is power!


To address the main thread: Those ceramic bathroom filters don't really fit flush against the wall of the cab, since the wires get in the way. They're designed so the wires will go back into the wall, which may keep them from being the mounting solution you might think they'd be. If you can figure a way to mount the $2 sockets, that sounds great (maybe use a hole saw in a 2x4 or something at the width of the socket?). Otherwise I'd go with that vanity you've got in there now.


I was thinking it may be a problem with the wire in the way. The vanity has the same concept though (wires going in the wall) so the extension cord will be going under the back but shouldnt be too much of a problem.

The vanity also isnt mounted yet. I had the cab laying flat to try to get an idea in my head about lights and exhaust. I am still not sure how I am going to do the lights and exhaust. Have a long weekend out of town. I am sure the cab wont be too far out of my mind. Maybe I can come up with a great solution before I get back.
 

sideshow1

Member
Hey!! nice setup!!
Yes I used silicone caulking but i must have taken that pic before..go to my new cab build in my albums to see lots of pics if you want...
I used a 1.5 inch drill bit for the intake holes..the ones they use to drill dead bolts...you can get them cheap...
there are 8 of those intake holes totalling 12 or so inches with a 4 inch exhaust hole...I went over the rule because of the heat in my cab...it works great!!
I also have a 3 inch intake with fan at the bottom to draw cool air in and up..lowered temps by 3 degrees!!!
Hope this helps but please feel free to keep asking us questions bro!!!
cant wait to see your cab in action!!!!!
take care


How are you light proofing the 3 inch intake?

I havent completely decided how I am going to do the ventilation or lights. I will probably make a decision then wish I had did something else.
 

sideshow1

Member
I thought driving might help me come up with a decent plan.

Here it is: I can get the surge protectors. I can run 4 bulbs in the surge protector mounted on the back of the cab. I can link surge protectors together and run 2-3 bulbs on the side of the cab with one surge protector on each side. Then run the first surge protector into the timer.

Even if I only did this on one side, it seems like it would be easier to mount and take up less room while not sacrificing light.

What do you guys think?
 

007.

Member
So you're going to build a light socket that turns directly into an electrical socket sans wire? How many watts are you going to run in CFLs like that? And this is a flower cab, right? You could possibly try what I've got in my cab as a veg solution.

I run DWC, so there's a surge protector raised off the ground in case of a leak. It is held up by thick heavy duty elastics stretched between those small metal screw/hook cuphanger things you can find in any hardware store. Attached to that the timer, upon which is another power bar which is mounted similarily, just above.

I run a clothesline style bit of twine through the middle of the top of the cab, and lay wires with CFL mounted sockets at their end over the twine, hanging down into my plants. With more screw/hooks attached to daisy chains of rubber bands attached to the light wires, I can move the CFL anywhere in the plant area, so that it is always hanging in perfect proximity to the maximum of plant area. It's kind of like vertical lighting (since you can allow all sides of the light to hit veg matter, without losing efficiency with a reflector), but you don't arrange the plants around the lights, you arrange the lights around the plants.

I'm pretty baked right now, but if any of that makes sense to you, that's good. If you need any clarification, I'm not always this baked.
 

sideshow1

Member
I was talking about hooking one of these up
6c9dd702-195b-49a5-8608-783710ccdfa4_300.jpg
to one of these
surgeprotector.JPG


And I can string them together if I need to.

I have a veg solution already. This cab will be to flower.

Thanks for the suggestions though. When I get back and get something going whether this or another idea, there will be photos.

In the meantime if anyone comes up with a good solution, I am all ears.
 
Top