What's new
  • ICMag with help from Landrace Warden and The Vault is running a NEW contest in November! You can check it here. Prizes are seeds & forum premium access. Come join in!

Hoosierdaddy's SWC Toob (Smart Valve controlled)

hoosierdaddy

Active member
ICMag Donor
Veteran
I am building a hydro system for my cab.
This system is very inexpensive and should allow me to be able to leave the grow for a couple of days or more with no worries. The 4" 90's run about $4 ea and the pipe is $7 for 5ft. I purchased a 3" hole saw for $18.
Air pump ~$16, silicone tubing for air lines $8, nylon tubing for water nute feed $pennies, Autopot Smart Valve $20
I had the res, but it is about a $30 item. (few bucks for fittings, valves and such)

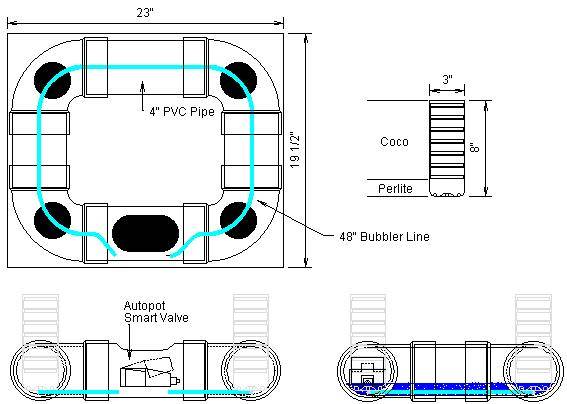
My flower area is only approx. 1 sq meter of floor space. I have a vertical tube with 2 HID's that will be in the center of this set-up.
The rooting pots will have a couple of inches of perlite in the bottom and the rest straight coco.
I will have a 48" air bubbler line that will run beneath all the root pots, and an additional air stone in the res.
42896swc1.jpg


The res is a DIY using a water dispenser.
I have epoxied the valve open, and have connected a 1/4" nylon line and a shut-off.
This res will set on a shelf next to the cab. (lines running to back of cab for stealth)
42896Photo_071808_005_reservoir.JPG

42896Photo_071808_004_resnozzle.JPG

I think I have the prototype of this jewel figured out. I have all the materials and am ready to construct. I will not be putting the system in place until the latter part of next month. I want to invite anyone and everyone to comment on this system before I actually start gluing pipe together.
There are a couple of issues that I am aware of that I think will be worked through just fine, but it is always a good idea to get input from other growers for some comment and suggestion.

Please feel free to critique this set-up. Good, bad, or ugly.
 

eyes

Active member
Veteran
id bubble the res instead of having the bubble curtain in the pvc pipe.since the smart valve will be watering the plants as needed,theyll always have the oxygenated nutrient from the res. looks good thus far.id use quarter inch black poly line but since you are going with the refrig line block the light from getting at it.keep us posted.
 

hoosierdaddy

Active member
ICMag Donor
Veteran
hoosierdaddy said:
I will have a 48" air bubbler line that will run beneath all the root pots, and an additional air stone in the res.
That is not refrig line on the res picture, it is Parker Paraflex nylon. A much sturdier material than any polypropolene or similar.
The line will not have enough direct light to create any sort of algae bloom except the short run in the cab, which I will tape up.

Thanks for stopping in and adding your comments, eyes!
 

petemoss

Active member
Hoosierdaddy,
You're a mad scientist! How does that Smartvalve work? Will the coco wick up water? Seems like only the bottom of the bottle (one litre?) will get wet.
 

hoosierdaddy

Active member
ICMag Donor
Veteran
Yes, the perlite and coco will wick the nutrients just fine.

The Smart Valve is connected to the direct nutrient supply via a 1/4" tube.
When the tray, or tube as it were, is dry the valve will open and allow water to enter. Once the bottom of the tray has 1" of nutrient height, the valve has an ingenious, yet simple secondary valve that will keep the inflow of water shut off until the level has dispersed from the tray. At the very moment the tray runs dry, the valve will open up and allow another 1" of nutrient in and repeat the process.

The following are sketches of how the Smart Valve works when used in the Autopots that Futuregarden also sells. Note how the depleted oxygen is forced out of the medium when the nutrient level rises, and returns a fresh charge of oxygen as it depletes:
42896smartpot.JPG


This is a detail of how the valve works:
42896smartvalve.JPG
 

Stone

Active member
I love that smartvalve! Everytime I see or hear about it, I want to rework my setup to include one. Drain to waste w/ no waste, ingenious!

That's a pretty slick setup there, brother. The only thing I see to warn about it to make sure that the pot wont allow the plants roots to fill the pvc and create flow or smartvalve problems...
I'm sure you have that covered, just making sure all your bases are covered.

Also you might want to do a few test runs, & maybe keep you res level low for the first while. B/C the only thing stopping that res from unloading in the cab is that smartvalve. Just saying make sure it works well before loading it up & leaving it for a week;).
 

PharmaCan

Active member
Veteran
Hoosierdaddy - I have my r/o unit plumbed to a 50 gallon drum and I turn the fill valve on/off manually. I'm using the same kind of tubing and valves as you have in your pics.

I'm thinking a SmartValve could be mounted inside the drum and make the filling automatic. Does it look like it would work for this purpose? If so, where to buy them?

Thanks,

PC
 

hoosierdaddy

Active member
ICMag Donor
Veteran
Thanks for stopping in, Stone!

The flood is my worst worry. But I will for sure give the unit plenty of good testing and quite a few cycles before I will ever trust leaving for a few days.
The system will give me the ability to also run pots along with the tubed plants if I want.
I am only showing 4 pot points now, but I plan on putting in an additional 3 whether I use them or not. I will cap those that I don't use.

The roots did enter my thinking, so I decided to leave the one side for the Smart Valve only.
The thing about my set-up that differs from a flat tray, is that the valves will not sit all the way at the bottom of the pipe. Being !3" wide, the valve will be somewhat elevated. My drawing is to scale and you can see what I mean above.

Thanks for the comments and suggestions, friend.
 

hoosierdaddy

Active member
ICMag Donor
Veteran
Howdy, Pharma!
Man, I never thought of it for a res control only.
Since it only allows a height of fluid of 1", you would have to mount the unit up high in the drum. And then it is going to only let 1" of the solution out, and will refill.
Yeah, I think it will work.

I don't know if I wouldn't rather trust a good old toilet ball though.
The Smart Valve is a very nice product and I think it will do a good job for me, but it does not have a lot of integrity. It is plastic after all.
But, maybe if you have a small (level) tray with holes in it at the top of your res, I am pretty sure it will work.

Futuregarden.com has the products. Lots of other goodies there as well. Take a good look, as they have things that are hard to find other places.
 

hoosierdaddy

Active member
ICMag Donor
Veteran
BTW...
The pots that I am using are Snawsomes doggie treat cans. LOL...
(I spoil my schnauzer rotten) :)
Any tubular container with a diameter of 3" will work. Pringles potato chip cans will work well and are a bit deeper, but they do have a metal bottom that will eventually oxidize.
 

FreezerBoy

Was blind but now IC Puckbunny in Training
Veteran
My first thought was you'd plug up the tubes with roots. Soex had that problem with a vaguely similar setup. Hopefully the pots will eliminate that problem. Will loose perlite or coco escaping the pots be a concern on the valve? You mentioned away time (a huge consideration for me) Given the unit is so small, have you considered simply using a big tub. I've got a single plant in an 18 gallon tub that can go 3-4 weeks without me.

Props for the Mad Drafting Skills. Always a pleasure to see your plans. If it works half as well as it looks, this should be fun.
 

PharmaCan

Active member
Veteran
hoosierdaddy said:
Howdy, Pharma!
Man, I never thought of it for a res control only.
Since it only allows a height of fluid of 1", you would have to mount the unit up high in the drum. And then it is going to only let 1" of the solution out, and will refill.
Yeah, I think it will work.

I don't know if I wouldn't rather trust a good old toilet ball though.
The Smart Valve is a very nice product and I think it will do a good job for me, but it does not have a lot of integrity. It is plastic after all.
But, maybe if you have a small (level) tray with holes in it at the top of your res, I am pretty sure it will work.

Futuregarden.com has the products. Lots of other goodies there as well. Take a good look, as they have things that are hard to find other places.

Thanks for this info, I'll check out that webstore. The problem with using a toilet ball inside the tank is mounting the damn thing. There's also the fact that toilet valves tend to be noisy and I don't want that annoying sound bothering me all the time.

PC
 

hoosierdaddy

Active member
ICMag Donor
Veteran
Hey Freez.
I am hoping that with the cups I will get a decent amount of root contained in there. I have cut out 3" pieces of vent filter material that goes in the bottom of the cup, that will keep the perlite and coco out of the tube, yet let the roots go through. That is the method that Futuregarden recommends with their full autopot set-up. They have special crap for sale.
On the tub...I need to keep my configuration with the vertical light in mind. The intake of the light is a 6" ducted hole in the middle of the floor.

Pharma,
I never thought about the noise issue, but you are correct, the SV is absolutely silent.
There is a great little video on their website with a fine chick demonstrating the valve and set-up.
 
Last edited:

eyes

Active member
Veteran
hoosierdaddy said:
That is not refrig line on the res picture, it is Parker Paraflex nylon. A much sturdier material than any polypropolene or similar.
The line will not have enough direct light to create any sort of algae bloom except the short run in the cab, which I will tape up.

Thanks for stopping in and adding your comments, eyes!


well it was hard to tell by the pic that it wasnt refrig line.but ,thats cool.when you getting this thing built?
 

flubnutz

stoned agin ...
Veteran
can you fit "T" fittings in there in the straights instead of cutting into the elbows? might be able to save yourself some cutting if you got room and they make straight T's (not the curved type).

btw does anybody use ABS instead of PVC? i think DWV ABS may be cheaper, not sure; only potential drawback is its black.
 
Last edited:

hoosierdaddy

Active member
ICMag Donor
Veteran
The "elbows" or 90's, are the easiest to drill holes in. They have a centering dot that allows a perfect center, whereas the straights do not.
I am not sure how I would use Tee's in this configuration and available space?
 

flubnutz

stoned agin ...
Veteran
i was thinkin on the straight pipe runs, substitute T fittings, with the ends joined to the elbows with "nipples" (short stubs of pipe, just enuf to join the fittings together), and have the side branch of the T pointing *up*, like a stack, then put the cans in those "stacks"; so, rather than the 4 pots at the corners, the 4 pots would be on the "straights" (formerly straight pipe, now T's). it would fit in your width, but in the 19.5" depth it might be tight; might save some cutting. the valve access point might be a challenge tho.

i like the plan, and btw great tech drawings, what you use? best of luck :yes:
 

hoosierdaddy

Active member
ICMag Donor
Veteran
Ah, I follow you now. I actually had thought about that, but I felt that the 4" opening would need a different sort of pot set-up. The larger the diameter of pot, the less of it I can get to the bottom of the pipe. A 4" wide cylinder will only go half way down into the horizontal pipe resting it 2" from the bottom, whereas a 3" cylinder will go within about 3/8" from the very bottom.

Also I measured and normal tee's won't fit with this footprint.
I do think that a tee tube could easily be made, and the upright part of the tee made into a custom pot of it's own. All it would need is a way to block the medium.
Maybe a net pot with some filter material glued at the bottom of the tee? (shrug)
 

hoosierdaddy

Active member
ICMag Donor
Veteran
The Groove Toob
Can you dig it? :pimp3:
42896Photo_080408_001.JPG


Here you can see the bubbler curtain that runs below the pots and the 1/4" shut-off valve
42896Photo_080408_002.JPG

The nylon tubing at the entry angle helps to keep the Smart Valve situated correctly in the tube.
The blue line feeds the bubble curtain and the res. stone using a 2 port bank and pump seen in first shot.
42896Photo_080408_003.JPG

:canabis:
 
Last edited:

Latest posts

Latest posts

Top