What's new
  • As of today ICMag has his own Discord server. In this Discord server you can chat, talk with eachother, listen to music, share stories and pictures...and much more. Join now and let's grow together! Join ICMag Discord here! More details in this thread here: here.

Duct Mufflers

Jnugg

Active member
Veteran
Anyone use one or used one?Just wondering as to how effective they really are becuase the ads say they will reduce perceived noise by up to 15-25dba (dba = decibels) and that each time you lower the volume by 3 dba it's like halfing the listners hearing.

So I f anyone is using a duct muffler or has used one before,please help.

I have details on how to build one,much like a popular carbon scrubber and ust wondering if it's worth spending the money to make one so I can have unimpeded/total cfm rather then get a solid state speed controller and slow the fan down as well as cutting the airflow down.
 
i would get a large CFM fan, and a speed controller, that way, if your room gets bigger, or you want to make more space, you dont have to buy another fan, but the real noise comes from the exaust, ive never seen plans to build one, but i know they sell them for 60-80 not really that expensive. but D-I-U selfers rule!!!
 
i would get a large CFM fan, and a speed controller, that way, if your room gets bigger, or you want to make more space, you dont have to buy another fan, but the real noise comes from the exaust, ive never seen plans to build a duct muffler but i know they sell them for 60-80 not really that expensive. but D-I-U selfers rule!!!
 

somoz

Active member
Veteran
hey jnugg they do help a considerable amount i've used them in multiple occasions and for the price if ur not strapped for a cash are worth it imo.

also if ur worried about noise build a soundproofed box around ur fan, so it will deaden the sound. also one of those acoustic speed controller fans are good as well but i've never personally worked with one but from what everyone says they work a treat.

good luck.
somoz
 

Underground Man

Active member
Using a speed conroller does not eliminate the need for duct silencers. The air still has to move and it will create noise.

In my setup there is a whooshing noise that comes out of the exhaust. I think it is coming from the rough interior surface of my plastic flex duct. I think I am going to try adding a lenght of PVC to the end, maybe I will line it with carpet to absob noise.

I am very interested to see if anyone has solved this problem. If you have plans Jnugg, please share them.
 

OldSoG

Member
they work very well! it makes an unbelievable difference. you can still hear the fan BUT it is much quieter. worth the $80.


peace,
 

Jnugg

Active member
Veteran
Thanks for all the opinions guys!

No need to run a speed controller with a 140cfm inline.The only reason I will be building a duct muffler is so I can place my exhuast right next to my window,that way I can exhuast the hot air much much easier (can't exhuast to another room or the attic) and will keep my temps that much lower seeing as right now the exhuast air just pools up in my room.

you want plans for a duct muffler huys,here ya all go!!!!

Dimensions
8" Diameter by 22-1/2" Long

Bill of Materials
2 each 8" x 6" HVAC Reducers
1 each 12" x 30" Galvanized Sheet Metal (Preferably 26 gauge, but I built mine out of some scrap 30 gauge)
1 each 24" x 24" - 1" Thick High-Density Foam (I purchased this at a craft store, acoustical foam may improve the performance.)
2 each 36" gutter guard mesh (Picture of brand shown below, purchased at H/D) 30-40 each 1/8" Pop Rivets
20-25 each Small Cable Ties or a Roll of Thin Wire
1 Tube of Caulk (Preferably a Heavy Duty Silicone or Duct Sealer)

Tools Required
Tin Snips Drill with 1/8" Drill Bit
Pop Rivet Tool
Tape Measure
Band Clamp (2)
Caulking Gun
Scissors
Straight Edge
Duct Tape
Black Sharpie

Estimated Cost
$20-$25

Building the Muffler

Step 1: Preparation of Inner Mesh

1. Select the wire mesh (gutter guard).

image6

2. Cut the wire mesh into 17" long pieces. Make sure the cut is square. (You will need four pieces this length.)

image7

3. Take two pieces and overlap about ¾" aligning the mesh. Take one cable tie, thread through the mesh about ¾" from the end and in the middle of the overlapped joint. Secure around both pieces, pull tight. Repeat the process on the other end of the mesh, making sure the pieces stay aligned. Secure three more cable ties evenly spread along the seam.

4. Select another piece of mesh and repeat the step 1C.

5. Select the final piece of mesh. Repeat step 1C, but do not attach the final side.

6. Take one of the 8" x 6" HVAC Reducers and insert the wire mesh into the 6" end. Spread the wire mesh until it is fairly tight against the sides of the reducer. Take a black sharpie and mark the point where they first overlap. The idea is to have the final wire mesh 6" in diameter. Remove the wire mesh from the reducer and set the reducer aside.

7. Align the wire mesh on the mark. Cable tie the pieces together on one end about ¾" from the end. You may have more overlap on the final seam, but it is alright. Carefully align the mesh all the way down to the other end and secure with a cable tie about ¾" from the end. Evenly space and secure three more cable ties in the middle.

8. Test fit the wire mesh tube into one of the 8" x 6" HVAC Reducers. The wire mesh tube should tightly fit into the reducer. Repeat on the other end. If the wire mesh is too tight or too lose, carefully cut the cable ties on one seam and adjust and re-attach.

image8


Step 2: Preparation of Acoustical Foam

1. Select the Acoustical Foam.

2. Measure and mark the size of the foam. Width of the foam was cut 1" shorter than the wire mesh, which will have 1/2" exposed when completed. Roll the foam around the wire mesh mark where the two ends meet flush.

Tip: An electric meat carving knife works extremely well for cutting the foam, but scissors can be used. I would avoid using a razor blade as the foam can tear.

image9

3. Wrap the sized foam around the wire mesh, evenly spacing the wire mesh that extends on each end. Match the foam face to face at the seam. Use 4" long pieces of duct tape on each end to secure the foam together. Repeat with duct tape in the middle. Finally, tape the entire seam with a piece of duct tape making sure the faces meet. The inner core is completed.

image10 image11

4. Set aside the inner core.


Step 3: Preparation of Outer Case

1. Select the galvanized sheet metal and two 8" x 6" HVAC Reducers.
2. Roll the galvanized metal into a roll if not already.
3. Center one edge of the sheet metal over the 8" end of the reducer. Make sure the sheet metal butts up against the lip. Drill one 1/8" hole through both pieces.
4. Spread a bead of caulk along the end of the sheet metal and realign the holes. Pop rivet the two pieces together.
5. Continue around the reducer, forming the sheet metal tight against the reducer. Repeat the process of drilling holes and installing pop rivets. This seam needs to be tight and sealed. Stop once you get about 2 inches from the end of the sheet metal and repeat the steps from the original pop rivet in the opposite direction. When you reach the point where the two ends overlap stop.
6. Run a bead of caulk along the edge of the overlapping seam to the other end of the sheet metal.
7. Take a band clamp and secure around the end that was pop riveted. Tighten; make sure the edges stay aligned.
8. Take the other 8" x 6’ HVAC Reducer insert it in the end and secure with another band clamp. Make sure the ends align. Note: Do not seal with caulking at this time.
9. Starting in the middle of the tube, drill 1/8" holes through the overlap about 1/4" from the edge of the seam. Secure with a pop rivet. Repeat this step everyone 2", alternating ends until you reach the reducers. Stop.
10. On the end that has been sealed and pop riveted, drill and secure the tube to the reducer.
11. Remove the band clamps.
12. Remove the reducer that is not sealed and pop riveted.
Note: If you make a mistake and rivet the end to be removed, drill out the pop rivet holding the reducer.


Step 4: Assembling the Muffler

1. Select the Inner Tube, Outer Case and 8" x 6" HVAC Reducer.
2. > Slide the Inner tube inside the case; be careful to avoid the pop rivets on the inside as they can snag and rip the foam.
3. Gently force the Inner Tube into the reducer.

image12
4. Place a bead of caulk around the outside of the 8" end of the reducer.
5. Slide the reducer into the Outer case. Work the reducer into the case until the sheet metal has reached the ridge. I had to use a small screw driver to gently work the sheet metal over the seam on the reducer. Adjust the Inner Tube during the process to ensure it fits inside of the reducer.
6. Once assembled, drill 1/8" holes and install pop rivets around end securing the reducer to the Outer Case.
7. Clean off any caulking that has pressed out of the seams.

image5


Step 5: Installing the Muffler

1. The muffler is attached in-line between the exhaust end of the blower motor and the filters.
 

2buds

Active member
Would a piece of insulated flex duct minus the inner plastic lineing do the same thing? From the pics I see of a duct silencer it looks to be open raw fiberglass on the inside to dampen the noise. Get a piece of 6" or 8" flex duct, may can find a scrap on a construction site and slip the inner plastic liner out, remove a section your existing setup, use some plastic zip strips to secure each end to your existing setup. Bada boom bada bing or I'm a dumbass and missed it all together. Either way, good luck.
 

Jnugg

Active member
Veteran
2buds....it is not fiberglass,it's that foam that some people put between their bed matress and sheets.Acoustical foam would be the best bet imo.
 

2buds

Active member
I've never used the silencer just seen'em in pictures. Maybe a piece of mattress foam rolled up and inserted inside some oversize flex duct then zip stripped in place? Just trying to help.
 

clowntown

Active member
Veteran
My 6" duct muffler arrived today, and it's more or less exactly as the guide described. To quickly summarize, it's an 8" smooth tube" with a 8" to 6" reducer on both ends. The inside is a diamond-patterened steel mesh, then a black thin sheet which I'm guessing is a lightweight sheet of felt, and the "filling" is a pink material which I would guess is ... fiberglas! Paid $62.50 for it which included free shipping :pointlaug, but could easily be DIY'd for about $25 - $30.
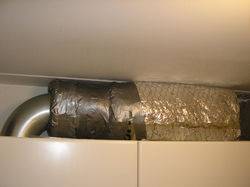
It's pretty solid and works fairly well. I did a simple test by putting it on the end of a flexible "dryer hose" run, and the air movement noise is lower at top-speed of the 6" Vortex with the muffler than lowest-speed w/o the muffler. With smooth bored ducting and ducting insulation sleeves, I think the noise would be very minimal.

One day when I get a camera I will post up some pictures of what you get when you pay ~$60 (which is to say, not much).
 

mrgrowmez

Member
heres my DIY muffler, works like a charm. its not silent but it cuts the noiise down so much that if you have music , tv or even quiet talking you cant notice my 265CFM is exhausting into the hallway next to where we sit on our couch...


i went downstairs to our apartment buildings garbage room where we have a 6" can fan and muffler running 24/7 (cant tell you how many times ive thought about stealing them both :yummy: ) measusred up the specs on the muffler and copied it.
its 92cm long and the insulation is 7cm thick rockwool, i simply took some wire mesh made a long tube with 6"diameter and then wrapped the rockwool around it and duct taped it up. i was inspired from TREEHUGGERS DIY....
was going to make an outer shell but just ended up wrapping it in some thin white foam i found behind my work.

i have it exhaust onto a layer of rock wool as well to cut down more on sound and have boxed all this section in with foam covered boards so its stealth and pretty :sasmokin:

it cost about 40 bucks to make with some insulation left over and that less then half what they charge for one here in sweden viva DIY :joint:
good luck to everyone else with their own!!!
MR.G
 

Latest posts

Latest posts

Top