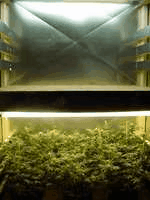
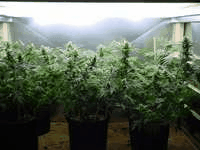
This is a legendary Dubphiend grow from OG. It shows Fluros coming out around .7 grams per watt**ok well first off this is going to be several posts to start. the first is about the cab overall, and the second post will be a closer look at the light racks please DONT post anything until the first 3 or so are up thanks!
This is the Work of Dub that someone requested I put up. This shows the power of T-8 Bulbs which are quite cost effective compared to T5 and easy to wire up..
"After doing some research on fluoro growing i was intrigued enough to scrap my 400hps hortilux C13 and try something new. So i first designed the 512W 48,000lumen T8 light rack with electronic ballasts. However, keeping the "ballast factor" in mind these number drop to 450watts @ 42,240 lumens...still not too bad for $100 worth of material. Yes this light rack only cost me $100! i dont want to hear that people cant afford good lighting anymore LOL... beofre i went ahead with the double decker idea, i thought id build a temporary grow box out of sheet metal. So essentially up until a week or so ago these plants were growing in what was essentially a huge peace of ductwork. My original idea was to just build a second cab if i liked the grow and stack it right on top...well i did do that but decided to make it a lot more sturdy and versatile.
What i came up with is what you see. A double decker cab made from 2x4's, 3/4"osb, and 26guage sheetmetal. Each cab measures 52"wide X 36" tall X 28" deep. Instead of moving the light closer to the plants i decided making rails that the floor could slide on and provide several levels to accomidate all ages of plants. The pictures will make this more clear. The cabs are each ducted bya 250cfm in-line duct fan that is then ducted through 6" un-insulated flex into a carbon scrubber i built a year or so ago and have been useing with my C13. The vent system isnt done for the top cab yet, so there are no pics of it but its pretty basic anyway. Its only to move air and a little bit of heat becuase these ballasts dont create much heat. The fans exchange the air in each cab a little voer 10 times a minute. for an intake is justa 6" hole that is tapped with 2 elbows to keep light in. The doors are also not finished for the top cab yet. I have them but need a hand hanging them.
With this setup i hope to get aperpetual harvest going. For the next year or so the 2 strains ill be useing will be Sensi Seed's Afghani #1, and Spice of Life's Legends Ultimate Indica. I have a minimum goal of 1lbs every 8 weeks. The top cab will hold 4 mothers, 2 of each strain, and the other half will be used for cloneing and veg. The veg half can hold up to 9 ladies in 2gal pots. The bottom cab currently has AK-48 in it and its 20 days into flowering. For more on that click the link in my sig. The top cab is loaded with 5000K tubes, and the bottom flowering cab is filled with 3000K. I will prob experiment with different mixed spectrums to see what works best. but i figured this would be the best starting place. also the light rack is wired such that the lights are staggered according to ballast which gives you the oppurtunity to have only half the lights on but still have complete coverage of the grow area. This is good for saving electricy when cloning, and also clones dont need all that light LOL. The temps stay in the high 80's toward the lights and about 72 at the flooor. Humidity fluctuates between 40 and 80% after i water humidity def goes up of course. for the most part is 50% though. Well, i think thats about it so heres the pictures. It sort of the process in building the cab, from start to finish.
Pic 1 Just getting started

Pic 2 One side skeleton done
Pic 3 Now with the metal

Pic 4 One side done the oter not

Pic 5 both done

Pic 6 built and in my room (excuse the mess my dog tear shit up lol)

Pic 7 front side view into it

Pic 8 now in the actual grow room with its lights on

Pic 9 now with the doors shut (and you can see the top corner of the carbon scrubber)

Pic 10 The cab DONE!"
This is the Work of Dub that someone requested I put up. This shows the power of T-8 Bulbs which are quite cost effective compared to T5 and easy to wire up..
"After doing some research on fluoro growing i was intrigued enough to scrap my 400hps hortilux C13 and try something new. So i first designed the 512W 48,000lumen T8 light rack with electronic ballasts. However, keeping the "ballast factor" in mind these number drop to 450watts @ 42,240 lumens...still not too bad for $100 worth of material. Yes this light rack only cost me $100! i dont want to hear that people cant afford good lighting anymore LOL... beofre i went ahead with the double decker idea, i thought id build a temporary grow box out of sheet metal. So essentially up until a week or so ago these plants were growing in what was essentially a huge peace of ductwork. My original idea was to just build a second cab if i liked the grow and stack it right on top...well i did do that but decided to make it a lot more sturdy and versatile.
What i came up with is what you see. A double decker cab made from 2x4's, 3/4"osb, and 26guage sheetmetal. Each cab measures 52"wide X 36" tall X 28" deep. Instead of moving the light closer to the plants i decided making rails that the floor could slide on and provide several levels to accomidate all ages of plants. The pictures will make this more clear. The cabs are each ducted bya 250cfm in-line duct fan that is then ducted through 6" un-insulated flex into a carbon scrubber i built a year or so ago and have been useing with my C13. The vent system isnt done for the top cab yet, so there are no pics of it but its pretty basic anyway. Its only to move air and a little bit of heat becuase these ballasts dont create much heat. The fans exchange the air in each cab a little voer 10 times a minute. for an intake is justa 6" hole that is tapped with 2 elbows to keep light in. The doors are also not finished for the top cab yet. I have them but need a hand hanging them.
With this setup i hope to get aperpetual harvest going. For the next year or so the 2 strains ill be useing will be Sensi Seed's Afghani #1, and Spice of Life's Legends Ultimate Indica. I have a minimum goal of 1lbs every 8 weeks. The top cab will hold 4 mothers, 2 of each strain, and the other half will be used for cloneing and veg. The veg half can hold up to 9 ladies in 2gal pots. The bottom cab currently has AK-48 in it and its 20 days into flowering. For more on that click the link in my sig. The top cab is loaded with 5000K tubes, and the bottom flowering cab is filled with 3000K. I will prob experiment with different mixed spectrums to see what works best. but i figured this would be the best starting place. also the light rack is wired such that the lights are staggered according to ballast which gives you the oppurtunity to have only half the lights on but still have complete coverage of the grow area. This is good for saving electricy when cloning, and also clones dont need all that light LOL. The temps stay in the high 80's toward the lights and about 72 at the flooor. Humidity fluctuates between 40 and 80% after i water humidity def goes up of course. for the most part is 50% though. Well, i think thats about it so heres the pictures. It sort of the process in building the cab, from start to finish.
Pic 1 Just getting started

Pic 2 One side skeleton done

Pic 3 Now with the metal

Pic 4 One side done the oter not

Pic 5 both done

Pic 6 built and in my room (excuse the mess my dog tear shit up lol)

Pic 7 front side view into it

Pic 8 now in the actual grow room with its lights on

Pic 9 now with the doors shut (and you can see the top corner of the carbon scrubber)

Pic 10 The cab DONE!"
Last edited:


 nice work chosen.. i remember dubphiends grows from OG and the setups he made, are u doing a replica of it??, if so i wish ya luck with it too, will be fun following your grow .


