What's new
  • ICMag with help from Landrace Warden and The Vault is running a NEW contest in November! You can check it here. Prizes are seeds & forum premium access. Come join in!

Air layering tops

Jon

Member
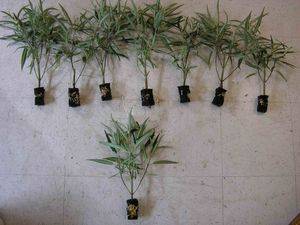
Hey guys I've got a beautiful 2 1/2 tall lavender growing indoors/outdoors waiting to be permanently transplanted. As you can see, she needs to get topped.

242257e70d117996f-thumb.jpg


I don't want to waste the top. I'd like to clone it to use for an early summer harvest using Silverback's 60/60 technique. What I'm wondering is if I can the air layering technique I would bump the thread but the last post in the air layering thread was posted by a dude with a bunch of questions and they went unanswered.

Any answers or advice would be appreciated.
 

zonkerpup

Member
Yeah, my trench layering question also went unanswered. Oh well, I'll post the results when I get them; that is if the plantings are a success. If not, I probably just slink back into my garden hole and try again. Good luck with your air layering tryout. I just goggled my trench layering question and got lots of basic info, but no specific mj info.
Peace, Kathy
 

sunnyside

Plant Manager
Veteran
Im not sure what trench layering is...but air layering is super simple.

1. get a clean razor blade and just scrape the outer layer of tissue away from the spot you want to layer.

2. Add rooting hormone (rootech) to the scared tissue.

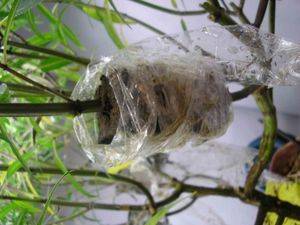
3. Wrap scarred tissue with rooting plug.

4. Wrap plug with clear saran wrap.

5. Keep moist.

Thats it!

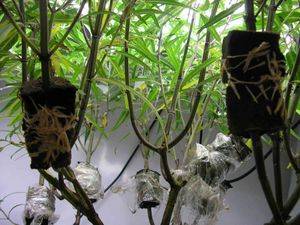
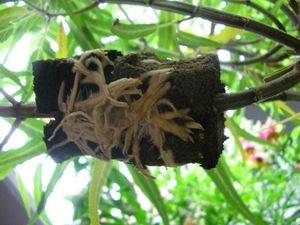
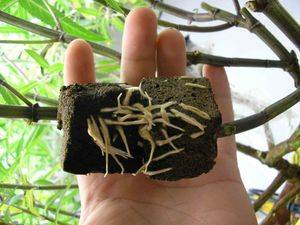
I've got some pictures somewhere...I'll find em and post em for you.
 

sunnyside

Plant Manager
Veteran
exactly hoosier :) a turkey baster, or a nutrient syringe, or a spray bottle would all be good tools for the job

I took some pics when I was layering my sage mom...it is the only good pics I have of the process... Nothing changes when layering jane. :yes:


Last edited:

hoosierdaddy

Active member
ICMag Donor
Veteran
I actually use peat pucks.
You need to get them wet so they expand as normal. Then I let them dry completely out. (may take a week or so...or faster next to an exhaust)
Then cut it in half only to the middle. Wrap around your prepared stalk, then tie it up with a twist tie or pipe cleaner. Then wrap with a layer of plastic wrap. Make sure you have an opening to allow hydration.
 

sunnyside

Plant Manager
Veteran
my experience is that the time frame is slightly longer than taking traditional cuttings. Every plant is different and every environment is different...so it is hard to say definitively how long it will take. If you know how long that particular plant takes to root when taking cutting...add a week. :)
 

Jon

Member
The potentially huge size of the cutting is what attracts me to air layering. If it takes a week longer than conventional methods, sounds good to me. Besides, there's pretty much a 100% success rate, no?
 

DIGITALHIPPY

Active member
Veteran
sunnyside said:
my experience is that the time frame is slightly longer than taking traditional cuttings. Every plant is different and every environment is different...so it is hard to say definitively how long it will take. If you know how long that particular plant takes to root when taking cutting...add a week. :)
nice clone technique...
 
I had read about this in a couple books, but never had I seen a clear description with pictures. Makes way more sense now, and I may in fact try this technique, very interesting.


How large of a plant can you actually create with this, that will successfully grow after being transplanted?
 

sunnyside

Plant Manager
Veteran
all those air layers in that last pic in post 5 came from one mom. There are no limitations to size or where to take the layers.

Once rooted well and transplanted to new media the new plant takes off just as fast as a well rooted cutting.
 

hoosierdaddy

Active member
ICMag Donor
Veteran
The secret to faster rooting is the preparation of the skin. The plant will root in the layer without doing any prep at all, but scraping the outer layer (epidermis?) and applying a rooting hormone speeds things up a bit.
I have found that rooting will also take place a bit faster if the medium is merely kept moist, and not waterlogged.

I saw a fella years ago that used cotton to air layer with, with good results. This was before pucks and rooters were easily available.

In my experience it takes anywhere from 12-20 days for roots to start showing.
But, you are saving probably more than 30 days easily. You have a mature plant when done that is ready to rock.

I like to stake them up to help with the extra weight.
And if you use rooters, do like ss does and use at least two, maybe three.
 
hoosierdaddy said:
I actually use peat pucks.
You need to get them wet so they expand as normal. Then I let them dry completely out. (may take a week or so...or faster next to an exhaust)
Then cut it in half only to the middle. Wrap around your prepared stalk, then tie it up with a twist tie or pipe cleaner. Then wrap with a layer of plastic wrap. Make sure you have an opening to allow hydration.

Well I just gave this technique a try and it worked perfectly no sweat. I used no rooting hormones at all. I acually went one step further and did not snip right under the peat puck but a quite bit lower down the branch. This way the single puck will be growing out 2 mainstalks with just one peat puck :joint: . One rootball two mainstalks. 100% easy.
I can see this technique being the foundation for a 12/12 from air clone. Picture 1 big fast growing stativa or indica mom growing under floros. Air clone her leaving a 5-12 inch branch above and snip 5-12 inches below the peat puck. Plant her and start to flower 12/12 from air clone. You will have 2 main stalks from every air clone. Each stalk would be much further along than any 12/12 from seed plant could ever be. If you get a zip from each main stalk and plant ten rooted peat pucks then thats 20oz. 30 days before the plants that went 12/12 from air clone are harvested you can start a new layer or two of peat pucks since the fast growing plant is still trying to grow through the roof.
 
Last edited:

chosen

Active member
Veteran
Airlayering is easy. If you don't keep the medium moist enough( no matter what it is), the stem will just harden up and you can start all over again.
 

onegreenday

Active member
Veteran
air-layering with coco coir fibre mat

air-layering with coco coir fibre mat

EDIT: asked to delte my thread on this & I move3d over my post here
since those pictures are so sweet.

Yo Sunnyside those air layered clones are huge.
kinda hard to call them clones, as they look like mature plants.

My bubbler clones had decent roots but took a long time
to get rolling when I transplanted into soil, so I decided to do air-layering; plus my plant count thing. The coco-coir fibre mat is pretty light. I hope it works.
==========

due to plant limits i'm adopting air-layering (AL)
as a method to keep plant numbers down by leaving
the AL clone still attached to the plant.

also since the clone is barely stressed; since it's not
cut from the plant till it has roots; then the clone should

be stronger and I should be able to have a larger cut
with many side shoots, that will quickly grow into
a fine plant specimen.

For organic people there are OMRI coco fibre squares
that are sold to cover square rockwool or coco fibre squares.

This is my rooting material. I cut it in a 1-2" strip about 2" long,
depending on stem thickness.
EDIT: a 1/2"-1" wide strip may be wide enough.

Then I soak the coir mat in a Maxicrop, superthrive & fulvic &
EC tea. To charge the coco mat with some goodies.

Take the mat out after soaking and fill the mat pores
with some fine chop coco fibre for a little more
moisture & nutrient holding.
Rub the coir dust into the coco fibre mat poors.

EDIT: You could mix some wormcast in with fine coco or smear the WC
right into the coco mat; so when the new root comes out it hits
the wormcast right off.

This is you rooting material and you wrap it around the stem where you
want your cut to be; but 1st

scrape the stem at the location you like, roughing up
the surface and take down some layers of the stem skin
to help the plant develop roots out of this scraped area.

Paint some rooting gel or powder on the scraped stem and
wrap your coco coir fibre around the stem, getting good contact
with the stem and wrap a plant twisty tie around the fibre at both ends.

slide the fibre mat up a little and down a little on the
stem to smear the rooting stuff and make good contact,
with the stem.

cover the fibre with a small piece of black plastic to block
light from the roots that will grow into and through your
fibre mat

and also to hold moisture into the fibre mat. leave it open
at the top so you can water the coco fibre air-layer with a turkey baster
full of water or rooting liquid till a little comes out the bottom
of air layer.
EDIT: a plastic straw placed in water & capped with your fingertip
is a good way to get water to your airlayer. Remove straw
from water, while keeping your finger over the top end;
then place the other end onto the top of air-layer opening & remove finger;
to water your air-layer.

that's it. should get roots pretty quick and the plant will
continue growing so you can prune said air-layer while it's
still on the plant and get it going in the shape you desire.

I'll let you know how this works out.
Did it for the 1st time today.
 

onegreenday

Active member
Veteran
my experience is that the time frame is slightly longer than taking traditional cuttings. Every plant is different and every environment is different...so it is hard to say definitively how long it will take. If you know how long that particular plant takes to root when taking cutting...add a week. :)

Hey sunnyside I bet we could use willow bark to help rooting (see recipe below)
they use boiling water to release the hormones but I was wondering if ground willow bark or shavings could be mixed with the rooting material (cococoir/wormcast) to speed the air layering roots along.

EDIT: This is an ehow article:

Willow recipe:
A rooting hormone or tonic promotes root growth in plant cuttings. You can buy rooting hormone at nurseries but if you have willow trees nearby, you also can brew up your own.

Step One
Gather a handful of chopstick-size willow twigs. Fresh branches work best; avoid deadfall. Any variety of willow (salix) will work since they all contain the natural chemical IBA (indolebutyric acid) - a natural plant growth regulator.

Step Two
Chop the willow stems into 3-4 inch pieces with clippers or a cleaver. You should have about 2 cups of clippings to make a one gallon batch of willow bark rooting hormone.

Step Three
Place the chopped willow pieces in a large container and cover with 1 gallon of boiling water.

Step Four
Allow the prepared willow bark tea to stand overnight. The longer it steeps, the more IBA will be released into the water.

Step Five
Store the willow bark rooting hormone in the refrigerator in a sealed container. Label the container.

Step Six
Soak tip cuttings into the willow bark rooting hormone overnight prior to planting in soil. The IBA will infuse into the bark and stems encouraging rooting and inhibiting fungus, bacteria and viral disease.
Overall Tips & Warnings

* Willow bark rooting hormone will stay fresh up to two months in the refrigerator.
* Water young plants with willow bark rooting hormone. The salicylic acid from the willow will help defend plants against bacteria, fungus and viral diseases.
* Evidence shows that salicylic acid works by aiding the wound healing process. Absicsic acid is a stress hormone that all plants release in response to injury. It stops the movement of fluids through the system and ‰??shuts down' the injured area. The salicylic acid found in willow bark tea works to inhibit the wound response, hence allowing growth.
 

onegreenday

Active member
Veteran
The drawback to air-layering is the labor of going to each
cut & spraying to keep media moist, if you want a lot of cuts
it could be a lot of work
but great clones.........
 

Medical

Member
I use these little pill containers from a dollar store, they are rectangular in shape and divided into three or four compartments with flip top lids.
Remove the middle divider/s and carve round holes in the ends just large enough for the stem to pass through.
Fill with peat or coco moisten and snap on around prepped layering site.
Very easy to pop open to moisten medium.

Cheap and reusable!
 

onegreenday

Active member
Veteran
nice medical very nice & light block if dark plastic
or clear if looking for the new roots

but not much air exchange. I'm trying this out.

use a lower branch to support the box, I assume.

EDIT: you can use soft black vinyl/plastic pipe; short piece;
then slice with razor (careful) down the length;

spread it open and load with fibre, media,
rockwool, coir, spaghnum...
place around stem; supported by lower

branch; roots wil grow down out bottom & split
in plastic.
 

Latest posts

Latest posts

Top