What's new

Vintage Mexican, Seed germination and Micro propagation techniques.

Mystic Funk

Well-known member
So I see a lot of people on here that have old seeds and don’t know how to get them to germinate. So I thought I would shed some light on this and bring the topic up again. I’d also like to throw in some techniques I’ve learned along the way.
If you’re wondering what the vintage Mexican is all about I too have some very old Mexican seeds a good friend of mine gave me that I hope to bring new life back into. The buds that held the seeds were smuggled over the Mexican border into the US at the time when Mexican/Columbian and other import landrace cannabis was everywhere here. My friend would get large amounts of ‘’brick weed’’ smuggled up to him and he would then break it up and sell some and in the process of breaking it up he would find a lot of seed and if he liked the weed he would always save some seeds and put them in a jar. So over the years he ended up with a lot of seed. Even after the flood of sexy mexy bud dried up and went away he still hung on to those seeds. So I’m hoping to find some classic Mexican or Columbian in this jar of seed and hopefully not too many Dutch hybrids or wide leaf indicas. I know that Mexico is flooded with hybrids from all over the world now and it’s getting harder to find true Mexican landraces anymore.
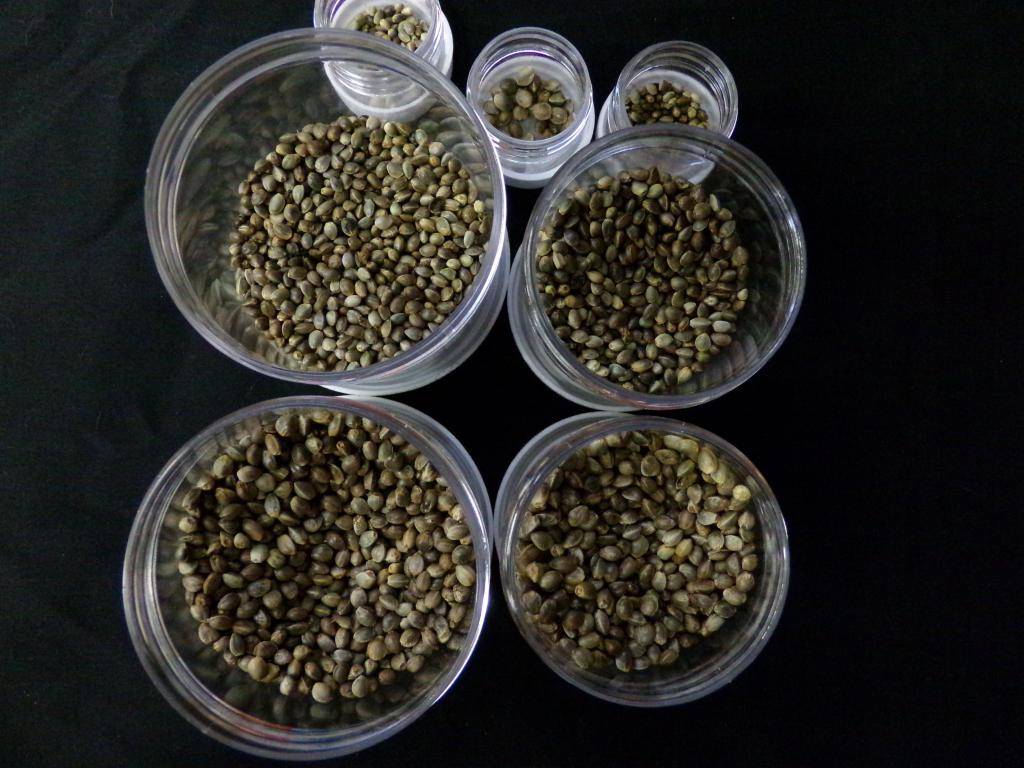
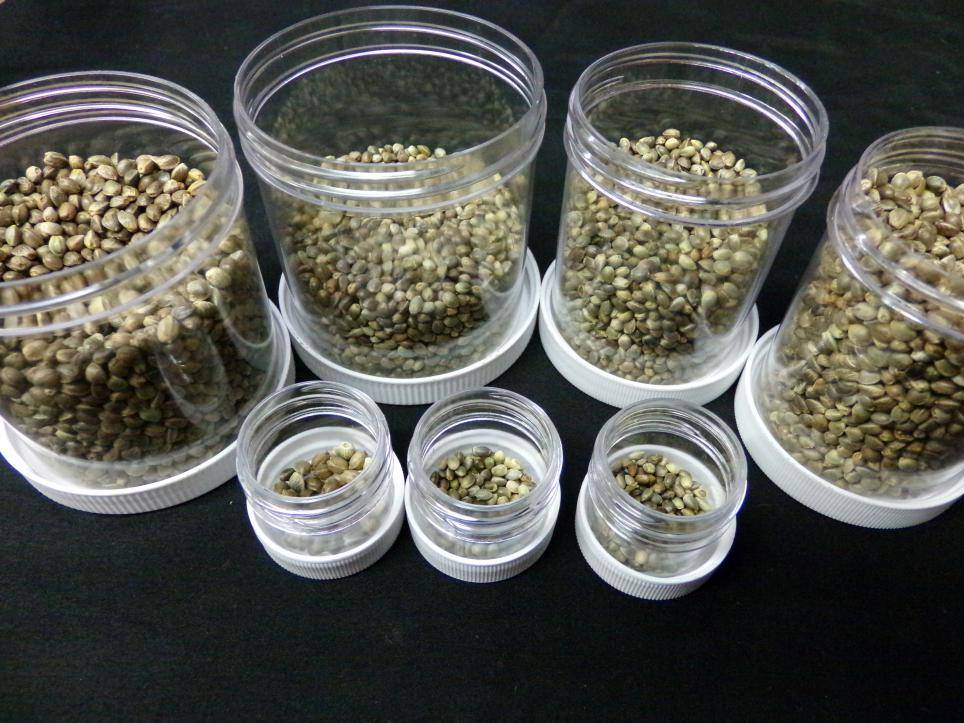
When I first received the seeds I cleaned out the jar of any stems and badly damaged seeds or ones that were white and had no change of germinating, then I sorted all the seeds by size from small, medium, large, and extra large. Most of all the seeds are ether light or dark brown with very small vanes running across them with little to no tiger striping there are a few exceptions though. They are mostly round not long seeds and they have a sharp edge running up one side. In my eye these look to be classic Mexican seeds as I remember them.
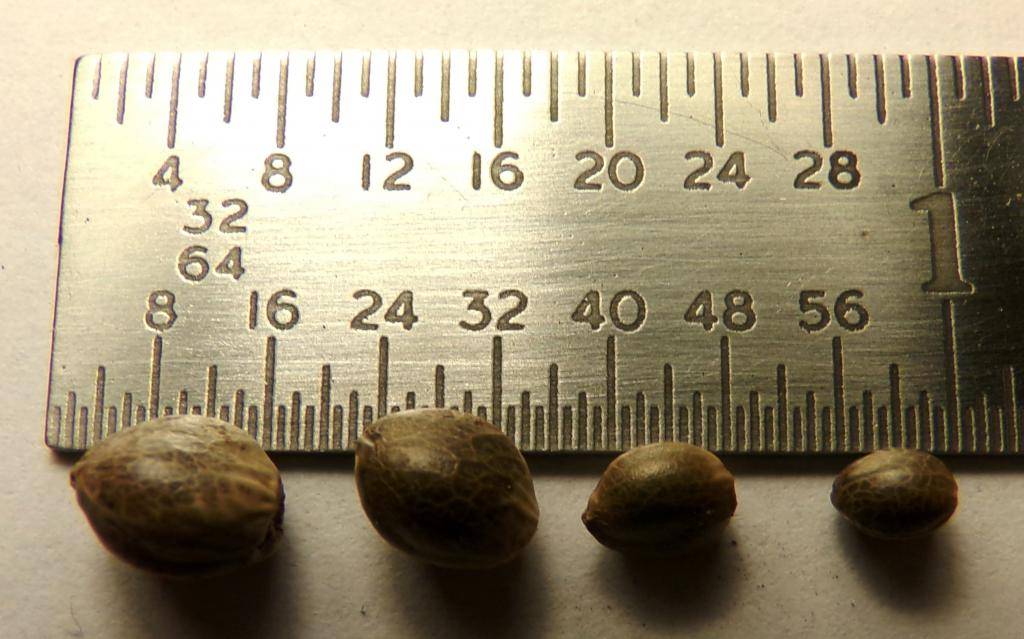
picture.php

picture.php

picture.php


This thread will not only be about germinating seeds. If I do get some of these seeds to pop I will also be doing some open pollination to preserve these old lines and that will be documented here also.
I would also like to gather up other peoples seed germination techniques and put them in this thread to get them all in one place. So if you have a tried and true method to get old beans to pop please post your recipe or link here.
-Thank you:tiphat:
 

Mystic Funk

Well-known member
Seed soak and paper towel method test #1

Seed soak and paper towel method test #1

I’ll start off with a simple germination method. The old seed soak and paper towel technique.
This test I will be using the large size seeds because that’s what I have the most of and I can afford to waste a few of these to find out what recipe works best. With each recipe below I will be using 50 seeds to get a accurate sample number.
Things you’ll need:
Shot glass
Paper towels
Pure water
Heat mat with controller
PH drops or pen
Ph up and down
Glass dinner plate or plastic bags


Here’s a list of recipes I compiled and some I made up. I will test all of these side by side to see which ones work best. Also I will be running a control test along with these that will be just plain ph’d water to see if there are any benefits to adding supplements.
With all the recipes listed below the seeds were soaked in the solution that was a ph of 6.3 to 6.5 for 24 hours then placed in two folded paper towels on a dinner plate then plain ph’d water was poured on the paper towels and the plate was then placed on a heat mat set to 75 to 80 °F

Recipe #1: 2 cups of pure water, 5ml botanicare blast off or a few drops of super thrive, 20ml of 3% hydrogen peroxide. This recipe is what I use for all the fresh seeds I pop and it’s always worked great for me.
Recipe #2: 2 cups of pure water, 5ml of kelp extract or kelp based nutrient, 5ml blast off.
Recipe #3: 1 quart of pure water, 1/4 tsp of bloom booster nutrient (or 1/4 strength of what bloom booster you have), 30ml of 3% hydrogen peroxide.
Recipe #4: 2 cups pure water, 5ml of blast off or a few drops of super thrive, 2ml of molasses.
Recipe #5: 2 cups pure water, 2ml of botanicare fulvex (trace mineral extract), 5ml of blast off.

The germination rates with each recipe:
Control test: 7% germination rate
Recipe #1: 10% germination rate.
Recipe #2: 8% germination rate.
Recipe #3: 6% germination rate.
Recipe #4: 10% germination rate.
Recipe #5: 12% germination rate.
Ok so I didn’t see any clear winner here I think their all within the margin of error. The germination rates were pretty good with seeds this old but I was hoping to find a recipe that would double or triple the germ rates but that clearly didn’t happen. Also none stood out from the control test.
 
Last edited:

Mystic Funk

Well-known member
Worm bins!

Worm bins!

Worm bins!
Yup! Worm bins work great to pop hard to sprout seeds. I don’t know exactly what’s going on in there but it works. maybe it’s the fertile casting, the high oxygen content from the worms fluffing the soil, the anti-mold / antibacterial properties, the consistent temperature the worms keep the soil. Maybe it’s all of the above? Hopefully someone will chime in and fill me in on the science behind this.
I think every organic grower should have a worm bins around. Worms are very easy to care for. They don’t cost anything once you buy them and set up the bins because they eat your old food scraps that would get composted or thrown away. If you don’t over load the bins you shouldn’t have any smells coming off the bins so you can keep them in your house and they don’t take up much space.
How to build your own bins:


I didn’t buy my bins I made mine out of black Rubbermaid type containers because I’m a cheap bastard and I wanted a huge worm bin to hold 5 pounds of worms or more. How I made my bins was I bought 19 gallon black contains with heavy duty snap over handle type lids and drilled a bunch of ½ holes in the bottoms to let the worms pass through each level freely. You will also need a stick of 2’’ PVC plumbing pipe too but I’ll tell you about that later. You need to find a smaller size container with a lid that can hold the full weight of your bins; this will be on the bottom of all your bins. my bins hold about 200 pounds of dirt and worm shit. You will need to drill a bunch of 1/6’’ or smaller holes in the lid to let access water drain through this container and not the worms. You should put a drain off one side of this container to be able to capture this liquid gold that will drain down over time.
First I take my old used up organic soil; lay that on the bottom of the larger bins a 1/3 of the way up that’s “bedding” for the worms. Then take the 2’’ PVC pipe and cut a piece as long as the height of the soil that is in each bin, these are there to hold up the bin above it so the bedding doesn’t get compressed, stack each bin one on the other then take one lid and drill small 1/6’’ holes in it for the very top one. You want good air circulation in your bins or they will rot.
picture.php


drain on bottom
picture.php


Ok. Back to seed germination.
If you put the seeds in the bins right away they won’t sprout. So what I do is a full run with the bins first to get the worms to work their magic. Put your food scraps and news paper in the bins and let the worms eat all of it until you see lots of worm casting on the top of the bedding. This may take a week or months it depends on how many worms you have. By now you should see lots of castings and little to no food scraps left and there should be no bad smell. Now mix up all the castings on the top evenly, now place the seeds on top of the soil and cover lightly. Place another worm bin on top to keep the heat and moisture even. In a week or so you should see many sprouts. Another cool thing is when your seeds sprout, don’t worry about them dying right away for some reason the seedling won’t rot or die in this black gold even though there’s no light in there you will have at least a week or more of good growth before they get too lanky.

With this test I didn’t presoak the seeds I just dropped the seeds in a worm bin, lightly covered with castings/soil and put another bin on top. Five days later I saw some seeds popping tails out and by day ten there was a mass of long seed sprouts popping out everywhere! I couldn’t believe how high the germ rates were and how fast they germinated it blew the seed soak and paper towel method out of the water. I got a 67% germination rate! I then planted the seedlings in solo cups and they are growing healthy and strong now.
picture.php


I didn't have enough room for all the seedlings so I just put a small cfl in the bin and their growing great LOL!
picture.php


just shows you how good worm bins work I threw in a piece of broccoli in there and it started growing!!
picture.php

peace!
-mystic
 
Last edited:

SICE

Active member
Any idea how old some of these seeds might be?

im having trouble with some 3 year old seeds i have
 

Mystic Funk

Well-known member
Any idea how old some of these seeds might be?

im having trouble with some 3 year old seeds i have


These range from 25 to 30 years old.


if your seeds were stored improperly germ rate will fall fast. luckily for me my friend stored these in a air tight jar and they were left indoors in a climate controlled storage container for that time.


stay tuned more germination techniques coming! I may be able to help you out.


peace
-mystic :tiphat:
 

t99

Well-known member
Veteran
Great thread, very interested in your results! I loved some of the great Mexican sativa brick from the 80's and early 90's! Such great happy highs! A lot of it was brown dirt weed, but there was plenty of quality!
 

Mystic Funk

Well-known member
Great thread, very interested in your results! I loved some of the great Mexican sativa brick from the 80's and early 90's! Such great happy highs! A lot of it was brown dirt weed, but there was plenty of quality!

:woohoo:

Talk about germination porn.

I bet there's some Skunk ancestors in those seeds. :tiphat:


thanks guys!
i'm crossing my fingers in hopes to find some nice gems in here.
I loved the old days of Mexican weed. good times!


:tiphat:
 

Mystic Funk

Well-known member
Awesome.

I always thought that the paper towel technique is the best but I've realized that the best germination method is to simply throw the seeds into the dirt and let mother nature do her thing. You can scuff 'em but that's not really necessary I think.


Yeah throwing them in worm shit is the best so far.
i'm working on doing a seed scuffing test next. also going to do a GA3 test too.


peace
-mystic
 

Buddah Watcha

Well-known member
Veteran
Very nice methods, worm bins ftw!

Thanks for sharing, keep us updated on these plants, very curious with what you will find! :)

Good luck!
 

Mystic Funk

Well-known member
Very nice methods, worm bins ftw!

Thanks for sharing, keep us updated on these plants, very curious with what you will find! :)

Good luck!


thanks buddah.
yes the worm bins killed it, amazing how simple it is too!
I think i'm going to try this method with the very small seeds and the x-large seeds because I have very little of them. I hear those are the best type of seeds. from what I read the x-large seeds could be Colombian and the small ones could Oaxacan or Acapulco gold seeds.
but i'm going to hold off for a bit because I have a few more methods to try.


peace!
-mystic
 

Mystic Funk

Well-known member
Micro propagation

Micro propagation

Micro propagation (aka tissue culture)
I’ve been screwing around with tissue culture for awhile now and I read somewhere that scientist were able to get 1000 year old seeds to grow that were found in ancient tombs and I thought why not use that for old cannabis seeds. So I started working on some recipes to pop old seeds.
What tissue culture is mostly used for is growing parts of plants like leaves, stems, flowers, or growing tips, technically you only need one living cell or a hand full of cells to grow plants through “in vitro” to grow a whole plant. If you’re good enough you can grow 1000’s of clones from one leaf it just takes time, pretty cool!
With these seeds I didn’t have to go crazy with the TC because I knew the cells within the seeds were still good from my other tests, they were just lacking the hormones, enzymes, auxins that kick start the germination process. So I developed some TC recipes that would aid in that process. So what does a seed need to germinate? They need grow regulators which are auxins, cytokinin, gibberellins and hormones like GA3 (gibberellic acid), benzylaminopurine (BAP), naphthaleneacetic acid (NAA). They also need sugars, nutrients, heat and moisture.
Things you’ll need to mix up a batch of TC medium:
picture.php


Air tight Containers that can handle a pressure cooker or autoclave.( I use canning jars).
Pressure cooker
Long tweezers
Latex gloves
Flow hood or homemade clean box
90% alcohol
3% Hydrogen peroxide
Heat mat
20grams of Sugar
4 to 6 grams of Agar (TC medium)
2.1 grams of Murashige & Skoog nutrient formula
1/2ml of Benzylaminopurine (BAP)
1/2ml of Naphthaleneacetic acid (NAA)
1/2ml of Thiamine B1
1ml PPM (TC preservative)
Food coloring (optional)
PH pen or drops
PH up and down
Distilled water
Scale to weigh out ingredients
These are not that strong of a mix you might get better results with a stronger mix…


Recipe #1: (red mix)
1 quart distilled water, 4 grams agar, 1/2ml BAP 1/2ml NAA, 1/2ml B1, 2.1 grams M&S, 20 grams sugar, 1ml ppm, a few drops of red food coloring.


Recipe #2: (blue mix)
1 quart distilled water, 4 grams agar, 1/2ml B1, 2.1 grams M&S, 20 grams sugar, 1ml ppm, a few drops of blue food coloring.


Ok start by mixing the ingredients then heating the mixture just until the agar dissolves, let cool down and then PH the mix to 5.6 to 5.8 and pour into your jars, put lids on loose and pressure cook for 30 minute at 15psi, let everything cool down and your lids should pop down and you’ll know they are sealed. Put in refrigerator overnight. Next day get everything you’re going to need tweezers, alcohol, paper towels, clean box, hydrogen peroxide, etc.
Start by mixing 50/50 sterile water and 3% hydrogen peroxide (when pressure cooking your mix, put a jar or two of distilled water in the cooker too, that’s your sterile water) this is what you’ll be cleaning and sterilizing your seeds in for one hour, when their soaking clean all of the tools, hands and surfaces you’ll be working with in 90% alcohol, Once the seeds are all clean place them in the jar and in medium about a quarter inch down as quickly as you can to limit the chance of contamination. Now seal them up and put them on a heat mate set to 75F. You should see them sprout in a couple weeks or so, but it could take months so be patient.
picture.php

picture.php

picture.php

picture.php


I still have some time to kill on these; I just started them about 3 weeks ago but so far the red mix is popping more seeds I guess the added growth regulators helped out. I’m up to 20% germination rate and about 10% with the blue mix. Also two out of the five jars got contaminated so that messes up the numbers.


peace!
-mystic
 
Last edited:

seeded

Active member
I've always loved pics of baby cannabis plants so seeing all these old vintage seeds getting sprouted in a variety of methods is absolutely fantastic. Thanks for sharing and I wish you the best of luck getting more sprouts.
 

corky1968

Active member
Veteran
My old cheap pressure cooker is dead.

Got to get me a nice All American brand.

Colored agar is an easy way to mark the jars. :tiphat:
 

Mystic Funk

Well-known member
I've always loved pics of baby cannabis plants so seeing all these old vintage seeds getting sprouted in a variety of methods is absolutely fantastic. Thanks for sharing and I wish you the best of luck getting more sprouts.


thanks seeded! :tiphat:


i'm so glad these seeds were given to me and I get a chance to work with them. it's going to be fun finding out what I get.


peace!
 

Mystic Funk

Well-known member
My old cheap pressure cooker is dead.

Got to get me a nice All American brand.

Colored agar is an easy way to mark the jars. :tiphat:


as long as your not on a terrorist watch list you shouldn't have a problem buying a new one from the usa. lol!


yes colored agar works great! it will dye the seedling a little though.
also if you use ph drops like I do make sure you PH the mix first before putting the coloring in......don't ask me how I found that out. I smoked way too many joints making it that day had to throw out a whole batch of medium. :laughing:
 

Latest posts

Latest posts

Top